To make a reel on Instagram, open the Reels camera from Create, record clips or pick them from your camera roll, add music, on-screen text and auto captions, then choose a cover, write your post caption and tap Share. A reel can run up to 20 minutes, but Instagram says reels longer than 3 minutes won’t be recommended to new audiences.
This guide walks through those six steps with the button names Instagram’s Help Center uses, then covers templates, photo reels and posting from a computer. If you would rather not appear on camera, the last part shows how to make a faceless reel, with two English examples made in NoLang that you can reuse as templates.
How to make a reel on Instagram, step by step
The steps below follow Instagram’s Help Center as checked in November 2026. The app changes often, so a button may sit in a slightly different spot on your phone, but the steps below should still apply. Only the way in differs between iPhone and Android.
1. Open the Reels camera
- iPhone: in your feed, tap Create (or swipe right anywhere in your feed), then tap REEL at the bottom.
- Android: tap your profile picture in the bottom right, tap Create new in the top right, then tap Reel.
Tap Camera at the top if you want to film something new. If you already have the footage, you can skip straight to your camera roll in the next step.
2. Record clips or add them from your camera roll
Tap and hold Record to capture a clip, or tap it once to start and again to stop. You can record several clips in a row, and the progress bar at the top shows how long the reel is so far. To use video you have already shot, tap your camera roll in the bottom left and pick the clips.
Before you record, the tool menu on the left lets you add music and choose which part of the song plays, pick an effect, change the layout or the speed, and set the length of the next clip. Once the first clip is in, Align clips shows a see-through image of the end of your last clip, so you can line up the next shot.
Clips can add up to 20 minutes in total. Instagram notes that reels over 3 minutes won’t be recommended to new audiences, so if you want Instagram to recommend the reel to people who don’t follow you yet, keep it to 3 minutes or less.
3. Add audio, text, stickers and effects
Tap Next. You can now tap Audio to add a track, Text to type on screen, Stickers or Effects. Text comes with options for alignment, color, highlighting and animation, and you can drag it anywhere in the frame.
If someone speaks in the video, the Captions sticker transcribes the audio for you. Tap the transcript to change its color or font, and tap it twice, then tap a word, to correct a mistake. The sticker may not be available in some countries.
4. Trim, reorder and add a voiceover in Edit video
Tap Edit video in the bottom left to open the timeline. Every clip, text, sticker and song sits on it, so you can see when each one appears and disappears.
- Drag the trimmers at either end of a clip to shorten it.
- Tap Reorder, drag the clips into a new order, then tap Done.
- Tap Add clips to bring in more footage.
- Tap a text or sticker to edit it, or press and hold to move it to a different moment.
- Tap Voiceover, then tap or hold Record to narrate over the video. You can record more than one voiceover clip and slide each one to where it should start.
In the US and a few other countries, you can also tap a line of text on the timeline and choose Text-to-Speech to have it read aloud, in English only, in one of several voices.
5. Choose a cover and write your caption
Tap Next. Tap Edit cover to pick a frame from the reel or add a cover image from your phone, then write the caption and add a location if it helps. Under More options, Enable closed captions writes the speech out as text for viewers, and you can decide whether others may use your reel as a template or download it.
6. Share it, save a draft or post it as a trial reel
Tap Share to post. If you aren’t ready, tap Save draft instead; you will find it later under Reels, then Drafts, on your profile. Drafts live on your phone only, so you can’t open them from another device, and they are lost if you uninstall the app.
With a public account, you can also tap Trial before sharing. A trial reel is shown to people who don’t follow you, not to your followers, and its insights arrive within 24 hours, so you can try a new idea and get early feedback. You need at least 200 followers on a professional (business or creator) account, or 1,000 on a personal one. From the reel’s insights you can share it to everyone later.
Other ways to start a reel
Use a template
A template reuses the music and timing of an existing reel, and you drop in your own photos or clips. In the Reels camera, tap Templates, choose one, tap Add media and select your photos or videos in the order they should appear, then tap Next. When a reel in your feed shows Template by…, tap it and then Use Template to start from that reel. Templates exist only for reels with music and at least three clips, so not every reel can be used this way.
Make a reel from photos
You don’t need any video at all. Instagram’s own guide notes that when you pick several photos from your camera roll in the Reels camera, they play as a slideshow; add a track from Audio and you have a photo reel. To change how long each photo stays on screen, adjust it on the timeline in Edit video, or use a template to borrow another reel’s music and timing.
Post a reel from a computer
On instagram.com, click Create on the left, then Post, then Select from computer and choose your video. Click Next to choose a cover frame and trim the start or end, click Next again to add a caption, location, tags and alt text, then click Share.
Instagram’s steps for a computer cover only the cover frame and the trim, so add music, text and captions in the app, or finish the video before you upload it.
Edit in Edits before you post
Edits is Instagram’s separate video editing app, for phones and for Macs with Apple silicon. It has a more detailed timeline, generated captions, a voiceover recorder and a teleprompter, and when you are done you can share the video straight to Instagram as a reel.
Size and safe zones
Instagram’s Help Center articles on Reels don’t give a recommended size. Meta’s ads guide for Reels recommends a vertical 9:16 video at 1440 × 2560 pixels, and suggests keeping text and logos out of the top 14%, the bottom 35% and 6% on each side, so the profile icon and buttons don’t cover them. The guide is written for ads, but it is a useful layout check for any reel: put your hook and key words in the middle of the frame.
How to make a reel without showing your face
Plenty of good reels never show the person who made them. The voice, the words on screen or the product carries the video instead. Four approaches cover most faceless reels:
| Approach | How you make it | Suits |
|---|---|---|
| Voice only | Film your hands, a place or a product, then add Voiceover or Text-to-Speech in Edit video | How-tos, behind the scenes |
| Text on screen | Clips or photos with timed Text and music | Tips, lists, quick facts |
| Photos | Photos in a slideshow or a template | Products, travel, before and after |
| Generated video | Make the whole video from a topic, a script or a few photos in a tool such as NoLang, then upload it | Explainers and product intros when you have no footage |
The last route helps most when you have an idea but nothing filmed, or a few photos but no time to edit. The two reels below were made in NoLang without filming anything, one from a topic and one from three product photos, as vertical 9:16 videos with English narration and captions.
Example: a tips reel made from a topic alone
This 44-second reel for Fernwood Coffee, a fictional coffee shop, started with nothing but its topic: no footage, no photos and no one on camera. Every clip and image in it was generated for the video. Its structure works for most tips reels:
- Hook, first 6 seconds: three quick cuts (“Same beans. Same kettle. Way better coffee.”) then a big “3” with a “#3 IS FREE” tag that gives viewers a reason to stay to the end.
- Three tips: each opens on a numbered title, and a bar at the top fills in as the tips go by. Numbers such as 1:16 and 195–205°F get a screen of their own so they can be read at a glance.
- Wrap-up: the three tips stacked as a checklist, a “Save this” prompt and the shop’s logo.
Coffee shop tips reel
A vertical Instagram Reel for a coffee shop that shares three tips for brewing better coffee at home, with English narration and captions and no one on camera.
Example: a product reel made from three photos
This 34-second reel introduces Cedar & Fig, the new fall candle of a fictional shop, Ember Lane Candle Co. It was built around the three product photos shown below, which were themselves generated for this example: the candle on a table, lit on a windowsill, and held in two hands. Around them, the video adds a generated scene for each point it makes: an autumn path for the season, cedar and figs for the two scent notes, and hands pouring wax for “poured by hand”. The lit photo also became a short clip of the flickering flame.
The narration runs from a question (“If autumn had a scent…”) to the product, its two notes and how it is made, then closes on “Tap the link in bio to get yours.” Small labels such as “NOTE 01 Cedarwood” and “OUT NOW” carry the details, so the reel still makes sense with the sound off.
New product reel from three photos
Using these three photos, make a vertical Instagram Reel for a small candle shop that introduces its new fall scent, Cedar & Fig, with English narration and captions.
For a longer product video made for your website or a sales page rather than a feed, see how to make a product video.
Make your own version in NoLang
Click Create a Video with This Template under either example. NoLang opens a preview of that reel and sets it as the model for your next video. Type your own topic, such as three tips from your trade or a different product, and send it; the new video is made in a similar style and structure with your content.
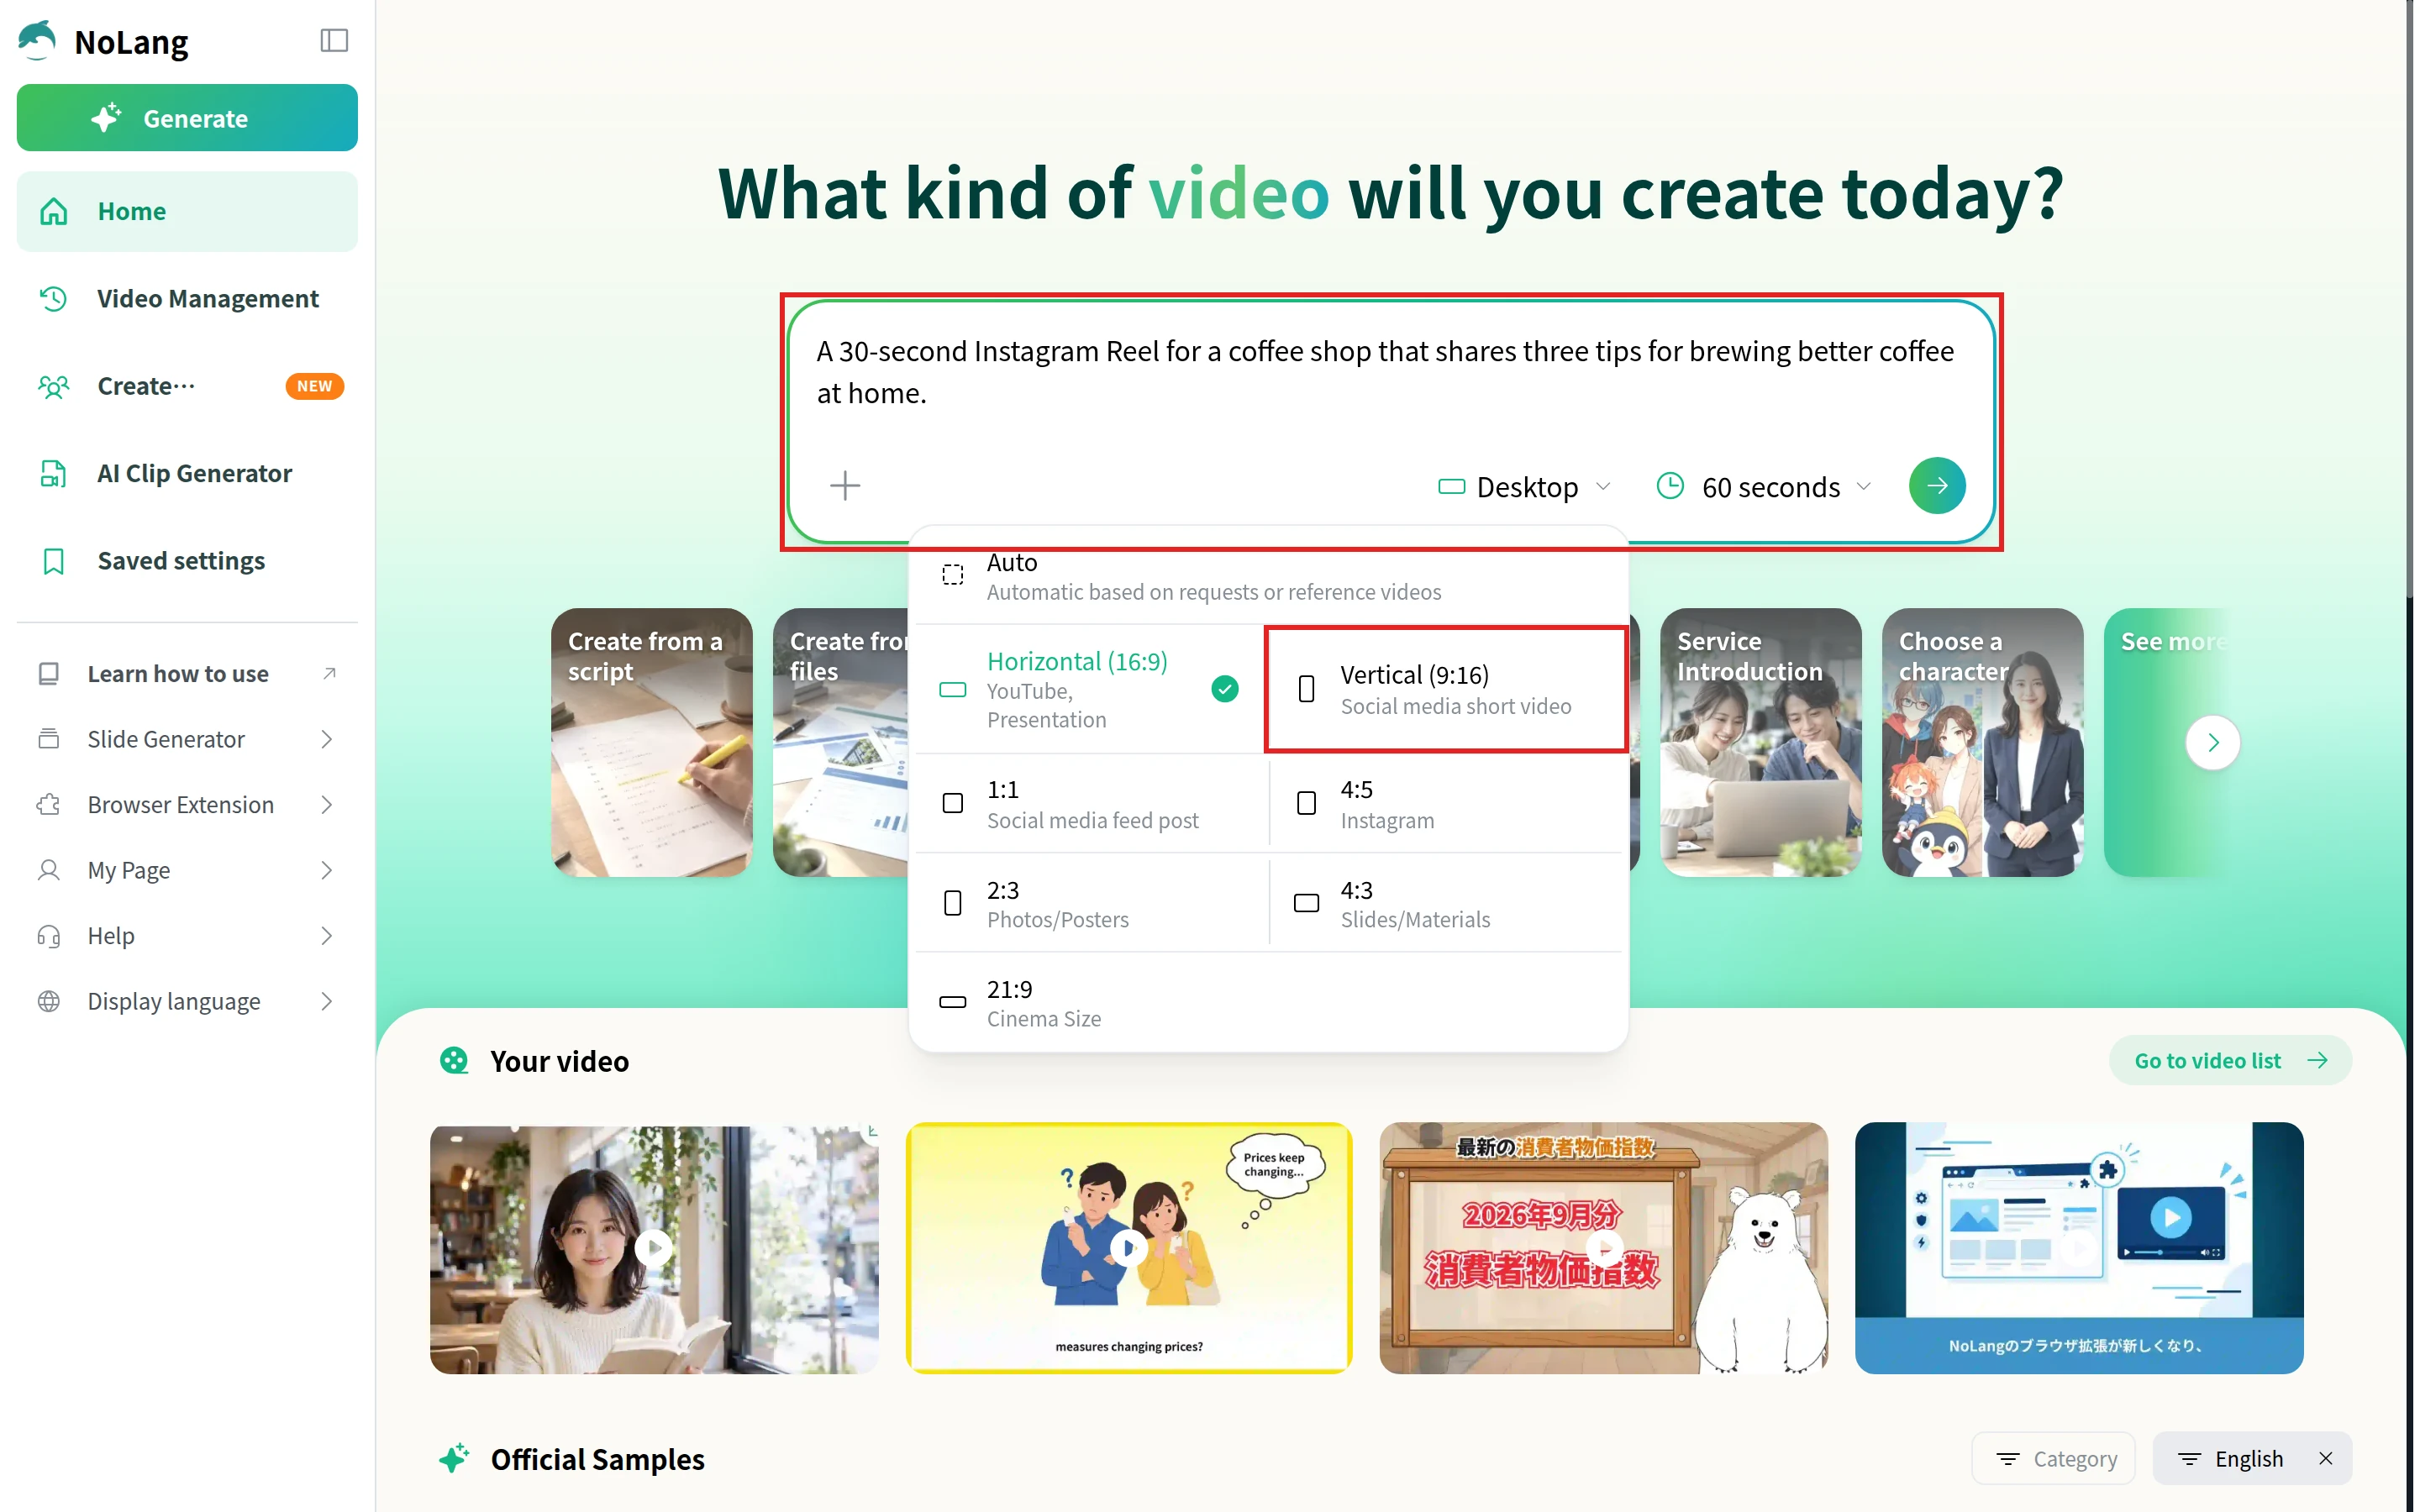
To start from a blank page, describe the reel in the prompt box on NoLang’s home screen. The button under the box shows the current aspect ratio (Desktop, for example); click it and choose Vertical (9:16), the ratio in Meta’s Reels ad guide above, rather than 4:5, then send the prompt with the arrow button.
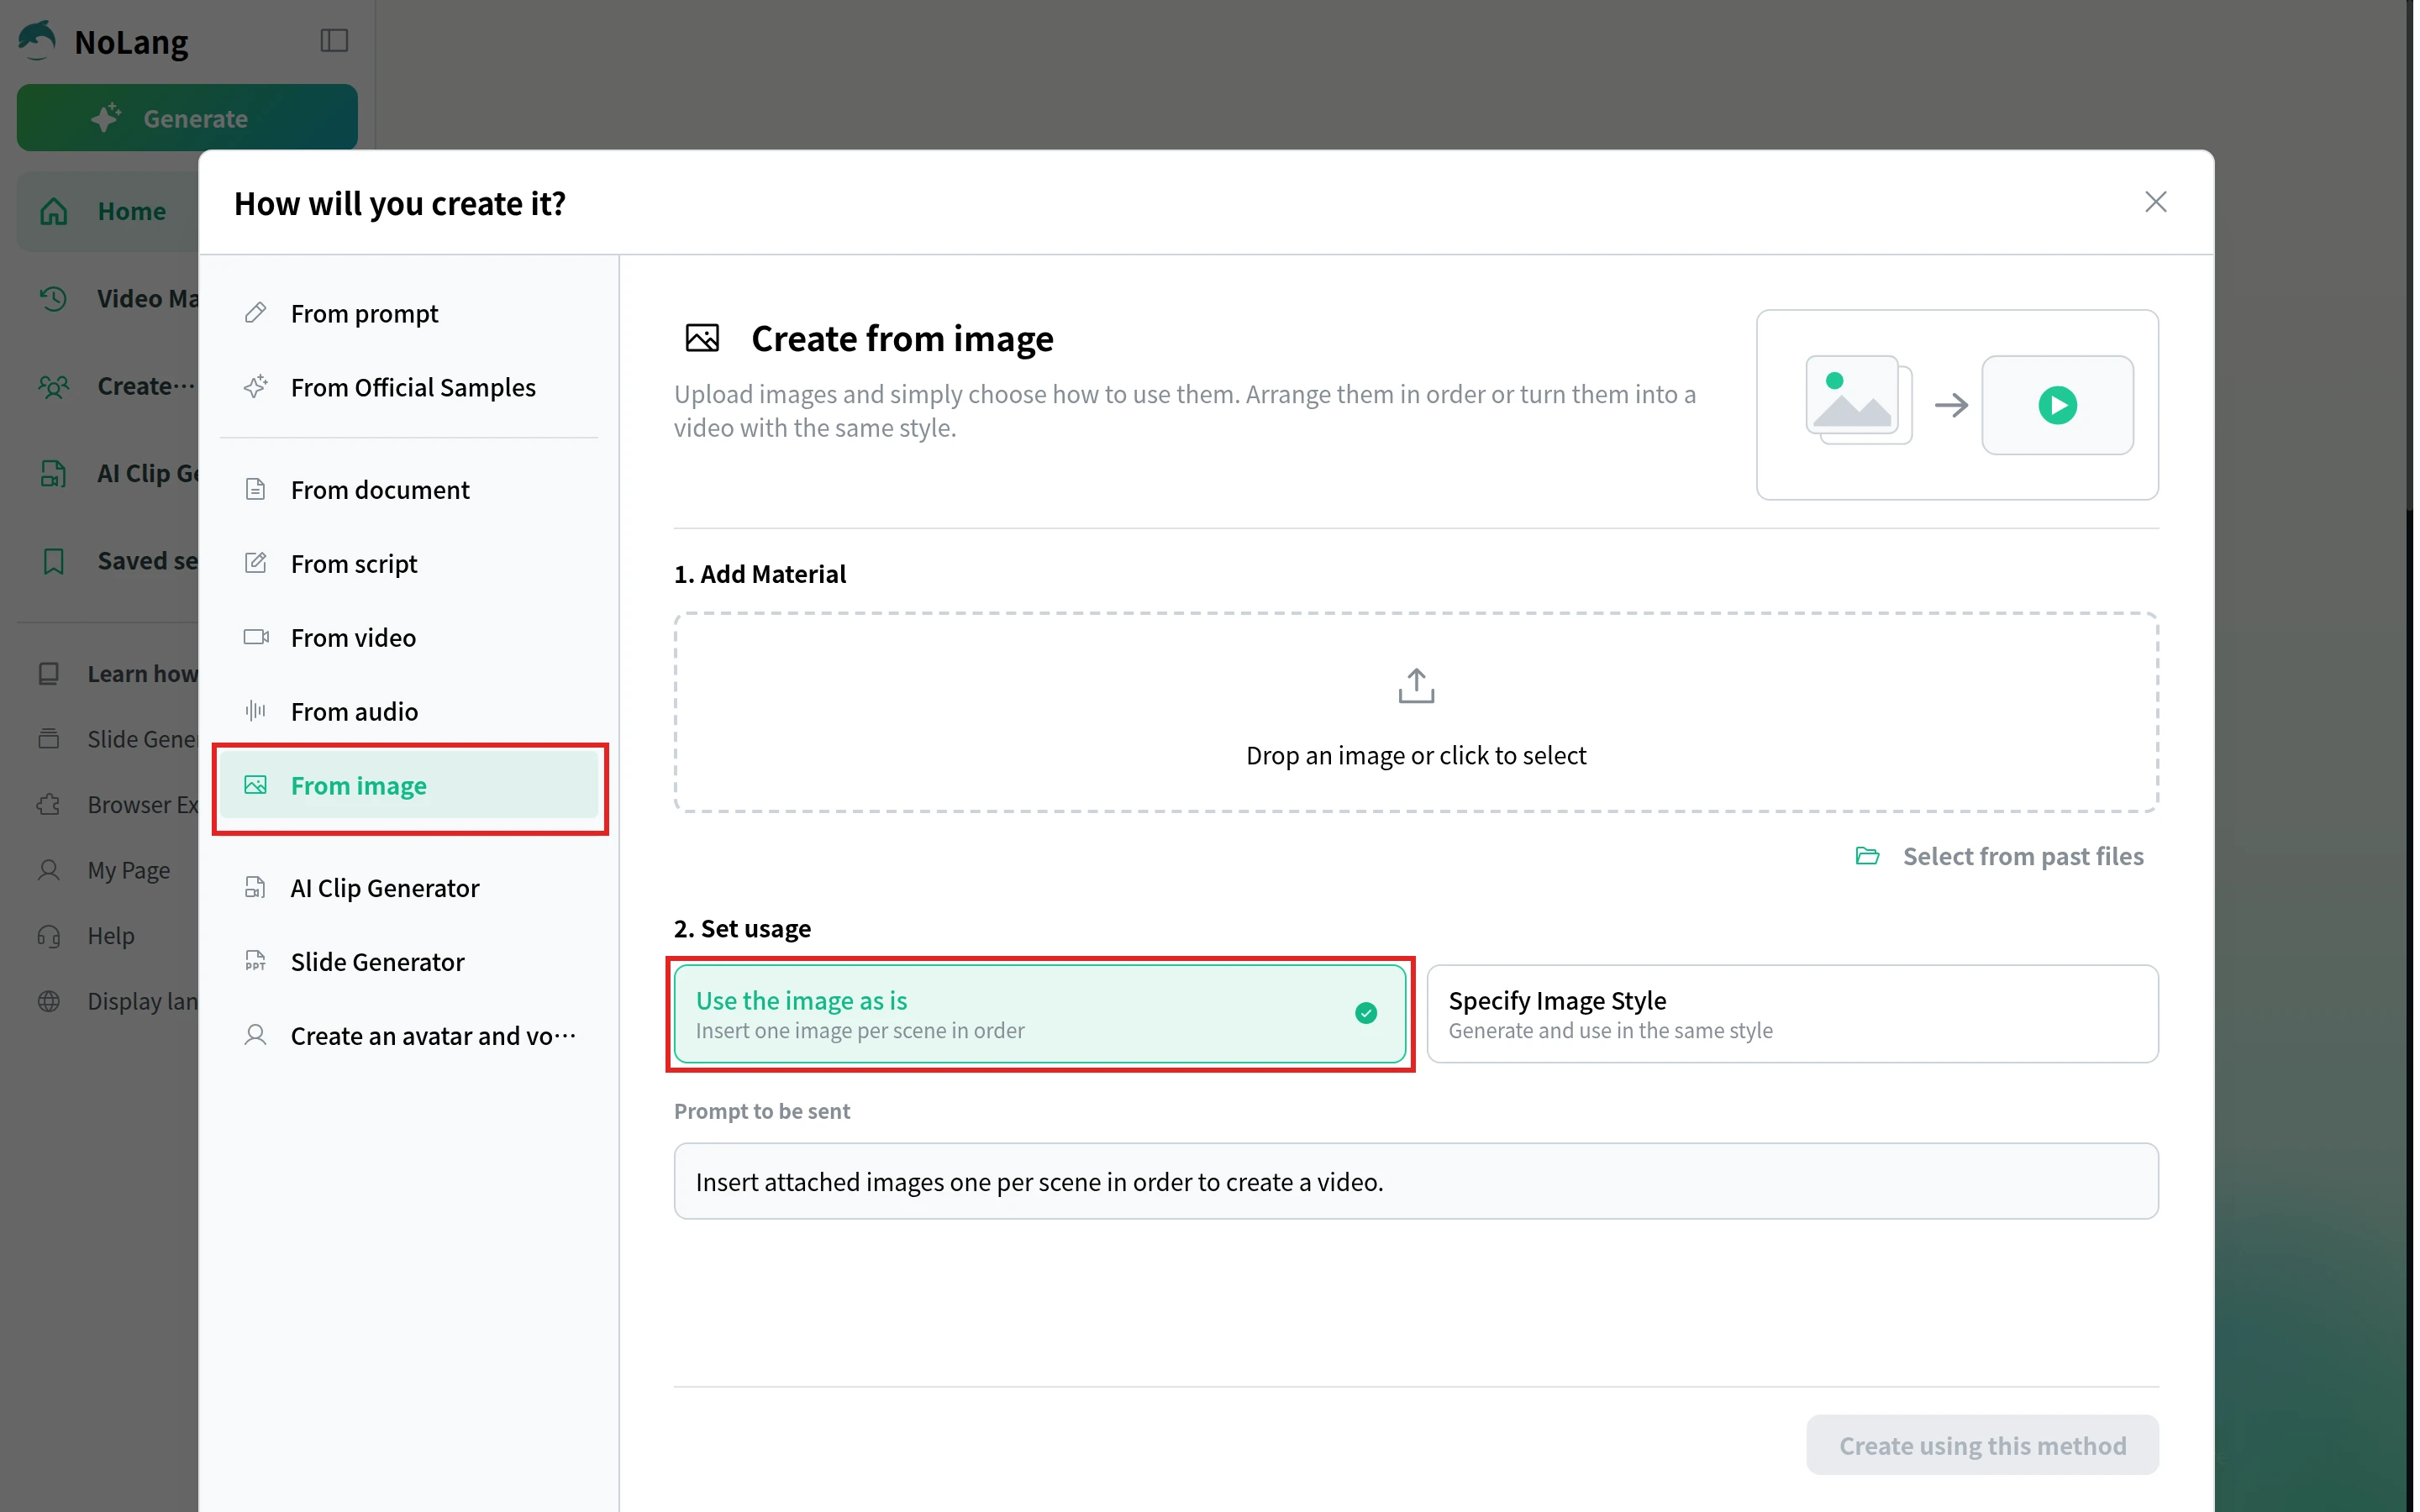
To build a reel around your own photos, click Generate at the top of the sidebar and choose From image under How will you create it?. Add the photos, keep Use the image as is, which puts one photo in each scene in the order you add them, and click Create using this method. The photos and the instruction move to the prompt box on the home screen, where you can add what the video should say about them before you send it.
When the video is ready, watch it with the sound on before you post. Check product names, prices, dates and the spelling in the captions, and make sure each line of narration matches what is on screen at that moment.
Get the video into Instagram
On the video’s page in NoLang, click Download and send the file to your phone in whatever way you usually move files. Then open the Reels camera as in step 1, tap your camera roll and pick the video. You can still add Instagram music, a cover and closed captions before you share it. From a computer, upload the same file at instagram.com.
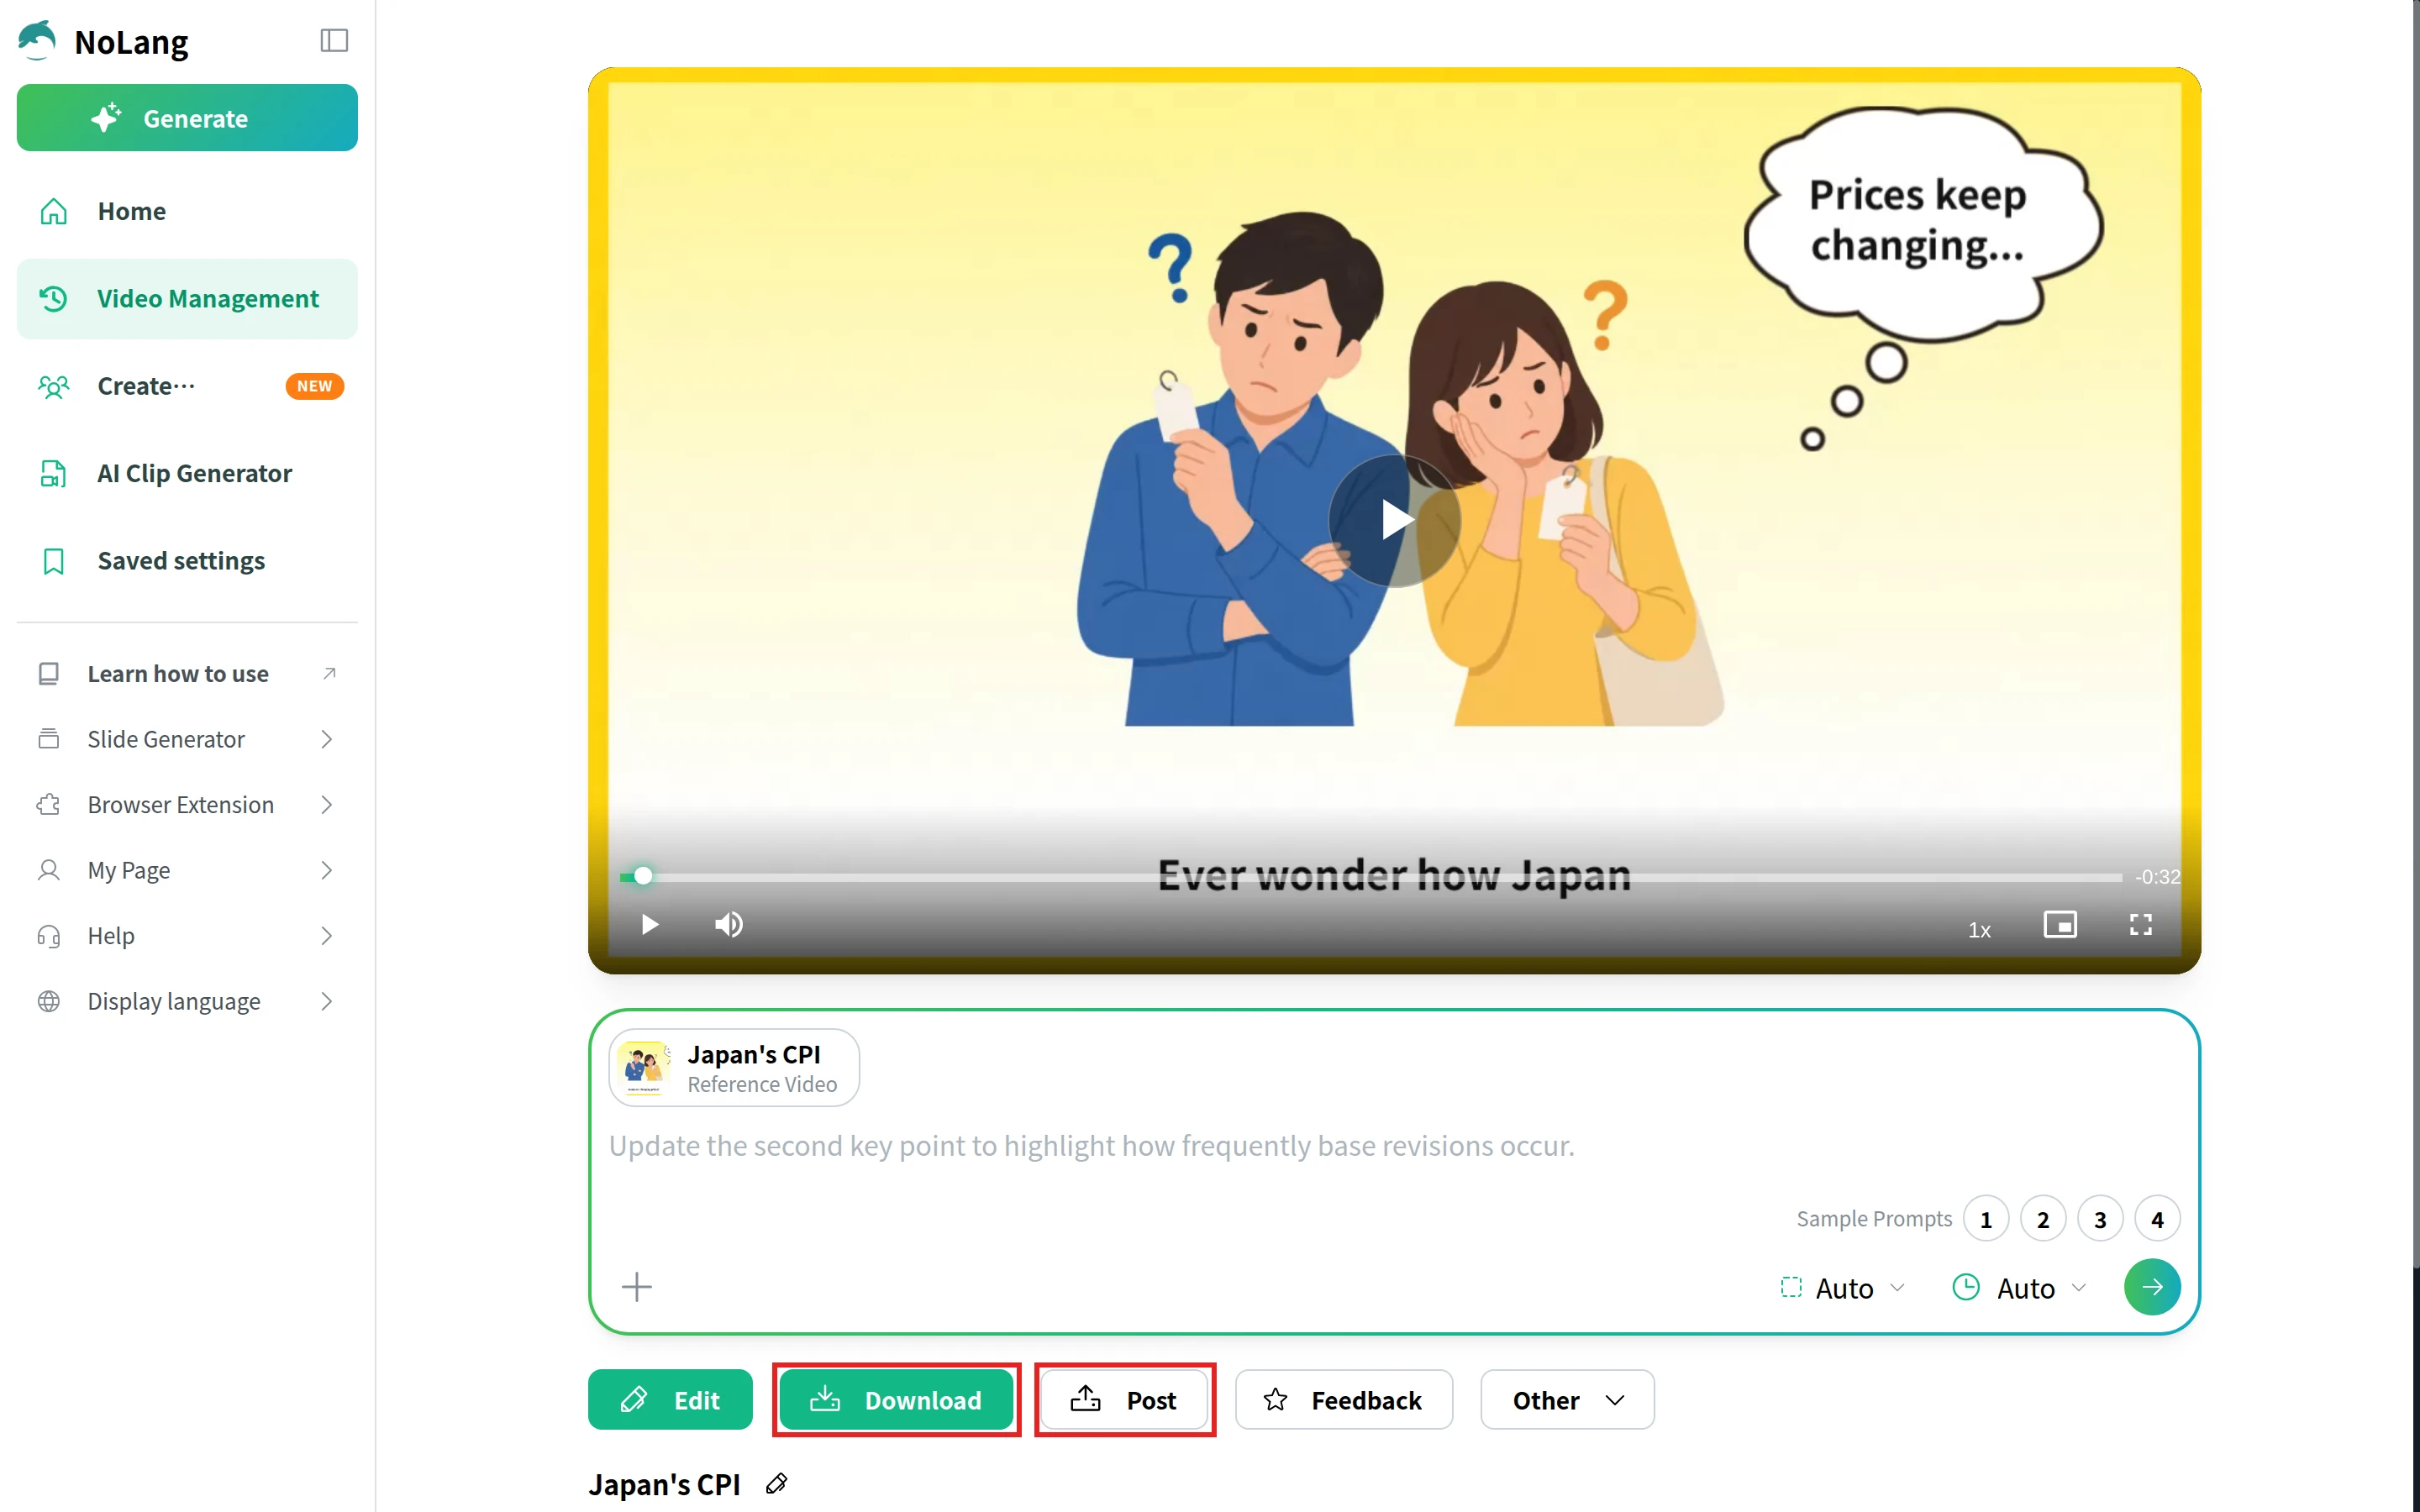
If you have linked an Instagram business or creator account, Post on the same page sends the video to Instagram as a reel, with a caption and an Also display in feed option that adds it to your profile grid.
Making reels for a business account
For a company account, the hard part of reels is keeping them coming: a new product, a seasonal offer, a quick how-to for customers, every week. NoLang turns a topic, a script, product photos or a PDF into a narrated vertical video, in English or any of 33 other languages, so a marketing team can post reels without booking a shoot. To see how it would fit your team’s workflow, contact our team or download the overview.
Download Materials