A photo slideshow shows the pictures you choose, in the order you choose, for a set number of seconds each, usually with music and sometimes with a voice that tells the story. Birthday parties, graduations, family trips and a look back at the year all follow the same order of work: decide where it will be shown, pick a tool, work out the length and the number of photos, put the photos in order, add text, narration and music, then save it and check it.
This guide takes you through each step with numbers you can use. It covers the tools you probably already have, namely Google Photos, the Photos app on Mac and iPhone, Clipchamp on Windows and PowerPoint, and finishes with how to turn your photos into a narrated slideshow video with NoLang, including a finished example you can reuse as a template.
| Step | What you do |
|---|---|
| 1. Decide where it plays | Play it from an app, or save it as a video file; pick landscape or vertical |
| 2. Pick a tool | A photo app, presentation software, a video editor or an AI video tool |
| 3. Plan the length | Turn the total length into a number of photos and seconds per photo |
| 4. Order the photos | Choose a story order and the first, peak and last photo |
| 5. Add sound and text | Captions, narration and background music |
| 6. Save and check | Export an MP4 and play it through on the screen you will use |
Decide first: play it on a screen or save it as a video
“Slideshow” can mean two different things. One is a playback mode: a photo app or presentation program shows your pictures full screen, one after another, on the device that is running it. The other is a video file, usually an MP4, with the photos, timing, music and voice built in, so it plays the same way on a TV, in an email or on social media.
| Where it will be shown | What to make |
|---|---|
| Your own laptop or a TV it is plugged into | Playback is enough |
| A venue’s projector or someone else’s computer | Video file (MP4) |
| Sent by email or message, or posted online | Video file (MP4) |
| With narration recorded in advance | Video file (MP4) |
Playback is quick and lets you change the order up to the last minute, but it only works on a device that has your app and your photos. A video file plays in any video player, which is why it is the safer choice whenever the slideshow leaves your own computer. If you build a slideshow in a photo app or in PowerPoint and later need a file, the tool sections below show how to save it as a video.
Choose the shape of the screen
Decide the shape before you start, because changing it later means reframing every photo.
| Where it plays | Shape |
|---|---|
| TV, projector, laptop, YouTube | Landscape 16:9 |
| Phone, watched upright (Reels, TikTok, Shorts, Stories) | Vertical 9:16 |
Most collections mix horizontal and vertical photos. On a landscape screen, a vertical photo leaves empty bands on both sides. Either fill them, for example with a blurred copy of the photo or a plain color, or crop the photo to the part that matters. Whichever you choose, use it for every vertical photo so the slideshow looks consistent.
Choose a tool
There are four kinds of tool, and the main difference between them is how much control you get over timing and sound.
| Tool | Good for |
|---|---|
| Photo app on your phone or computer | A quick slideshow of an album, with music chosen for you |
| Presentation software | Exact seconds per slide and text on each slide |
| Video editor or online slideshow maker | Music, transitions, motion and captions on a timeline |
| AI video tool | Narration written and voiced from your photos |
Before you put an evening into one, check these points.
Saves a video file : Can it export an MP4, or only play the slideshow inside the app?
Sound : Can you add your own music, and can you add a recorded or generated voice?
Free plan limits : Does the free version add a watermark or limit length or resolution?
Where your photos go : Online tools upload your photos to their servers. Check that you are comfortable with that for family pictures.
The steps below use the menu names in each company’s own help pages as of November 2026. Menus move between versions, so if a name differs on your screen, look for the nearest match.
Google Photos: make a highlight video
Google Photos turns a set of photos into a video with music under the name “highlight video”, which replaced the older “movies” on photos.google.com.
On a computer:
- Go to photos.google.com and, at the top right, click Create, then Highlight video.
- Click Create your own video and select the photos you want.
- Click Create at the top, then Save.
- To change the song or the order, open the video and click Edit. Click Music to change the song, and drag a clip to move it.
On a phone, open the Google Photos app, tap Create at the bottom, then Highlight video. Tap Select content, choose your photos, tap Create video (then Next if you picked the photos yourself), review the video and tap Save. On Android you can also start from a template, which comes with music, text and cuts timed to the beat.
Google’s policy says the music provided inside Google Photos is for personal, non-commercial use only, so a highlight video with that music should not go on a monetized YouTube channel or promote a business.
Photos on Mac and iPhone
The Photos app on a Mac has two kinds of slideshow. An instant slideshow plays straight away: select photos and choose File > Play Slideshow. A slideshow project is the one to use when you want a file:
- Select the photos, then choose File > Create > Slideshow > Photos.
- Click the Slideshow pop-up menu, choose New Slideshow, name it and click OK.
- Drag the thumbnails at the bottom into order, then pick a theme and music.
- In the duration settings, choose Fit to Music to match the slideshow to the songs, or Custom to set the length yourself.
- Click Export in the toolbar, choose a format (480p, 720p or 1080p) and click Save. Photos saves the slideshow as a video file.
On an iPhone, open Library, tap Select, choose your photos, tap the More button, then Start Slideshow. While it plays, tap the screen and use Customize to change the transition, the time per slide and the song, and Share to send it. Any album can also be played as a memory movie set to music. These steps follow Apple’s guides for macOS 27 and iOS 27.
Clipchamp on Windows
On Windows 11, Clipchamp is the built-in video editor; the older Video Editor in the Photos app is no longer included. Click Create a new video, drag your photos into My media, and add them to the timeline in order with the + button. Add a track from the audio category of the content library, then click Export at the top right and choose a quality. The video is saved as an MP4, usually to your Downloads folder. If you would rather start from a draft, Create a video with AI (auto compose) asks you for media, a style, landscape or portrait and a length, then builds a video with music that you can export or adjust on the timeline.
PowerPoint
PowerPoint gives you exact control over how long each photo stays up:
- Go to Insert, click the arrow under Photo Album, then New Photo Album. Click File/Disk, select your photos and click Create.
- On the Transitions tab, under Advance Slide, check After and enter the seconds for each slide. Click Apply to All to use the same timing everywhere.
- For background music, choose Insert > Media > Audio, then on the Playback tab choose Play in Background so the song carries on across slides.
- Choose File > Export > Create a Video, pick a quality such as Full HD (1080p), and set Seconds to spend on each slide (5 seconds by default) if you have not recorded timings. Click Create Video and save it as an MPEG-4 Video.
On a Mac, choose File > Export and pick MP4 as the file format. Turning a full presentation deck into a video is a bigger topic than a photo slideshow; the steps here only cover photos.
Plan the length, the number of photos and the seconds per photo
Start from how long the slideshow should be, not from how many photos you have. Once the length and the seconds per photo are fixed, the number of photos follows:
number of photos = total length in seconds ÷ seconds per photo| Total length | 3 seconds each | 4 seconds each | 5 seconds each | 6 seconds each |
|---|---|---|---|---|
| 1 minute | 20 | 15 | 12 | 10 |
| 3 minutes | 60 | 45 | 36 | 30 |
| 5 minutes | 100 | 75 | 60 | 50 |
If music carries the slideshow, making it the length of one or two songs keeps the cuts and chapter changes easy to line up with the music.
The right number of seconds depends on what comes with the photo.
| What comes with the photo | How long to show it |
|---|---|
| Music only | Shorter for lively runs, longer for the photos that matter most |
| A short caption | Long enough to read the caption twice at a relaxed pace |
| Narration | The time it takes to say the line, plus a short pause |
| A group shot or a busy scene | Longer, so people can find the faces they know |
The example at the end of this guide runs 95 seconds with 27 photos and two short clips, which works out at a little over 3 seconds per picture. No picture actually gets the average: in a quick run, a new photo lands about every second, while a full-screen photo with two lines of narration stays up for more than 6 seconds.
Vary the timing on purpose. A run of quick photos feels lively, and holding one photo for longer tells the viewer it matters.
Pick your photos and put them in order
Choose the photos
Go through the photos once and take out the ones that will not survive a big screen.
Out of focus or too dark : A blurry photo looks worse on a TV than on a phone.
Near duplicates : From a burst of similar shots, keep the best one.
Photos that need explaining : If a photo only makes sense with a long story, either give it narration or leave it out.
Then check the other way round: make sure everyone who should appear does, and mix wide shots that show the place with close-ups that show faces.
Choose a story order
| Order | Works for |
|---|---|
| Chronological | A trip, a year, a baby’s or a pet’s first year |
| Chapters | A life story, a graduation, an anniversary |
| Themes | People, places, activities |
Decide the first, peak and last photo
Pick three photos before you arrange the rest. The first photo tells viewers who or what the slideshow is about. The peak is the moment the story builds to, so place it in the last third. The last photo is the one you want people to remember, such as everyone together or a quiet closing shot. Arrange the remaining photos to lead from one of these to the next. The example opens on the puppy’s first day at 10 pounds, builds to the evening he “stopped being the new puppy”, and ends by repeating the first car ride a year later.
Add text, narration and music
Keep captions short and out of the way
Use a title at the start and, if you like, a closing line at the end. In between, add captions only where viewers need them, such as a name, a place or a year. Keep them clear of faces, and use the same font and position throughout. If the video will be posted on social media, where many people watch with the sound off, put the essential information in text as well as in the narration.
Write narration one or two sentences per photo
Narration turns a set of pictures into a story. Write it for the photo on screen, and say what the picture cannot show: what happened just before, why the moment mattered, what someone said.
One or two sentences per photo : Longer lines force you to hold one photo for too long.
Let the line set the timing : The time it takes to say the line is how long the photo stays up.
Read it aloud first : Lines that look fine on paper often run long when spoken.
In the example, 211 words of narration fill 95 seconds, a little over two words per second including pauses. The lines are short, and each one sets how long its photo stays on screen.
| Photo | Narration | On screen |
|---|---|---|
| The puppy on Mia’s lap in the car | “We brought him home on a rainy Saturday in March.” “Mia held him the whole way, and didn’t say a word.” | 6.3 seconds |
| A chewed shoe, a stolen sock, a toilet paper trail | “Shoes.” “Socks.” “Toilet paper.” | About 1 second each |
| A knocked-over houseplant | “One very confused houseplant.” | 3 seconds |
| A first look at the lake | “Summer brought his first lake.” “He was scared of the water for about four minutes…” (the sentence finishes on the next shot) | 4.8 seconds |
Put music under the voice, and use music you are allowed to use
Keep the music well below the voice while someone is speaking, and let it come up in the stretches without narration. Change tracks, if you use more than one, at a chapter boundary rather than in the middle of a run of photos.
Songs you buy or stream are still protected by copyright. The U.S. Copyright Office notes that there is no rule allowing a set number of notes or a percentage of a work, and in cases of doubt it recommends getting permission. Before you share or post the video, choose music whose license tells you where you may use it.
Music built into your tool : Check its terms. Google Photos, for example, limits its music to personal, non-commercial use.
YouTube Audio Library : If the video goes on YouTube, tracks from the Audio Library in YouTube Studio are copyright-safe and are not claimed through Content ID. Tracks under a Creative Commons license need a credit to the artist in the video description.
Other royalty-free music : The license, not the word “free”, decides where you can use it. Read it before you choose.
Use one transition and gentle motion
Pick one transition, such as a simple crossfade, and use it everywhere. Viewers stop noticing it, which is the point. If you want a different transition, save it for the move from one chapter to the next.
Still photos look more alive with slow motion: a gradual zoom in, or a slow pan across a wide shot. Keep the movement slow and in one direction per photo, and do not zoom into a face so far that it fills the screen.
In the example, full-screen photos zoom in, zoom out or pan slowly, and the quick runs drop small prints onto a paper background one at a time, so the screen keeps changing without a showy transition between photos.
Export and check before you share
Save the slideshow as an MP4 at the size of the screen it will play on, such as 1920 × 1080 for a landscape video. Then watch the exported file all the way through, on the device you will use if you can.
Order and timing : No photo appears twice, and no photo flashes past too quickly.
Faces and captions : No caption covers a face, and cropping has not cut off anyone’s head.
Sound : The voice is clear over the music on the speakers you will use.
The playback device : The file opens on the venue’s computer or TV. Bring a copy on a USB drive as well as in the cloud.
How to make a narrated photo slideshow with NoLang
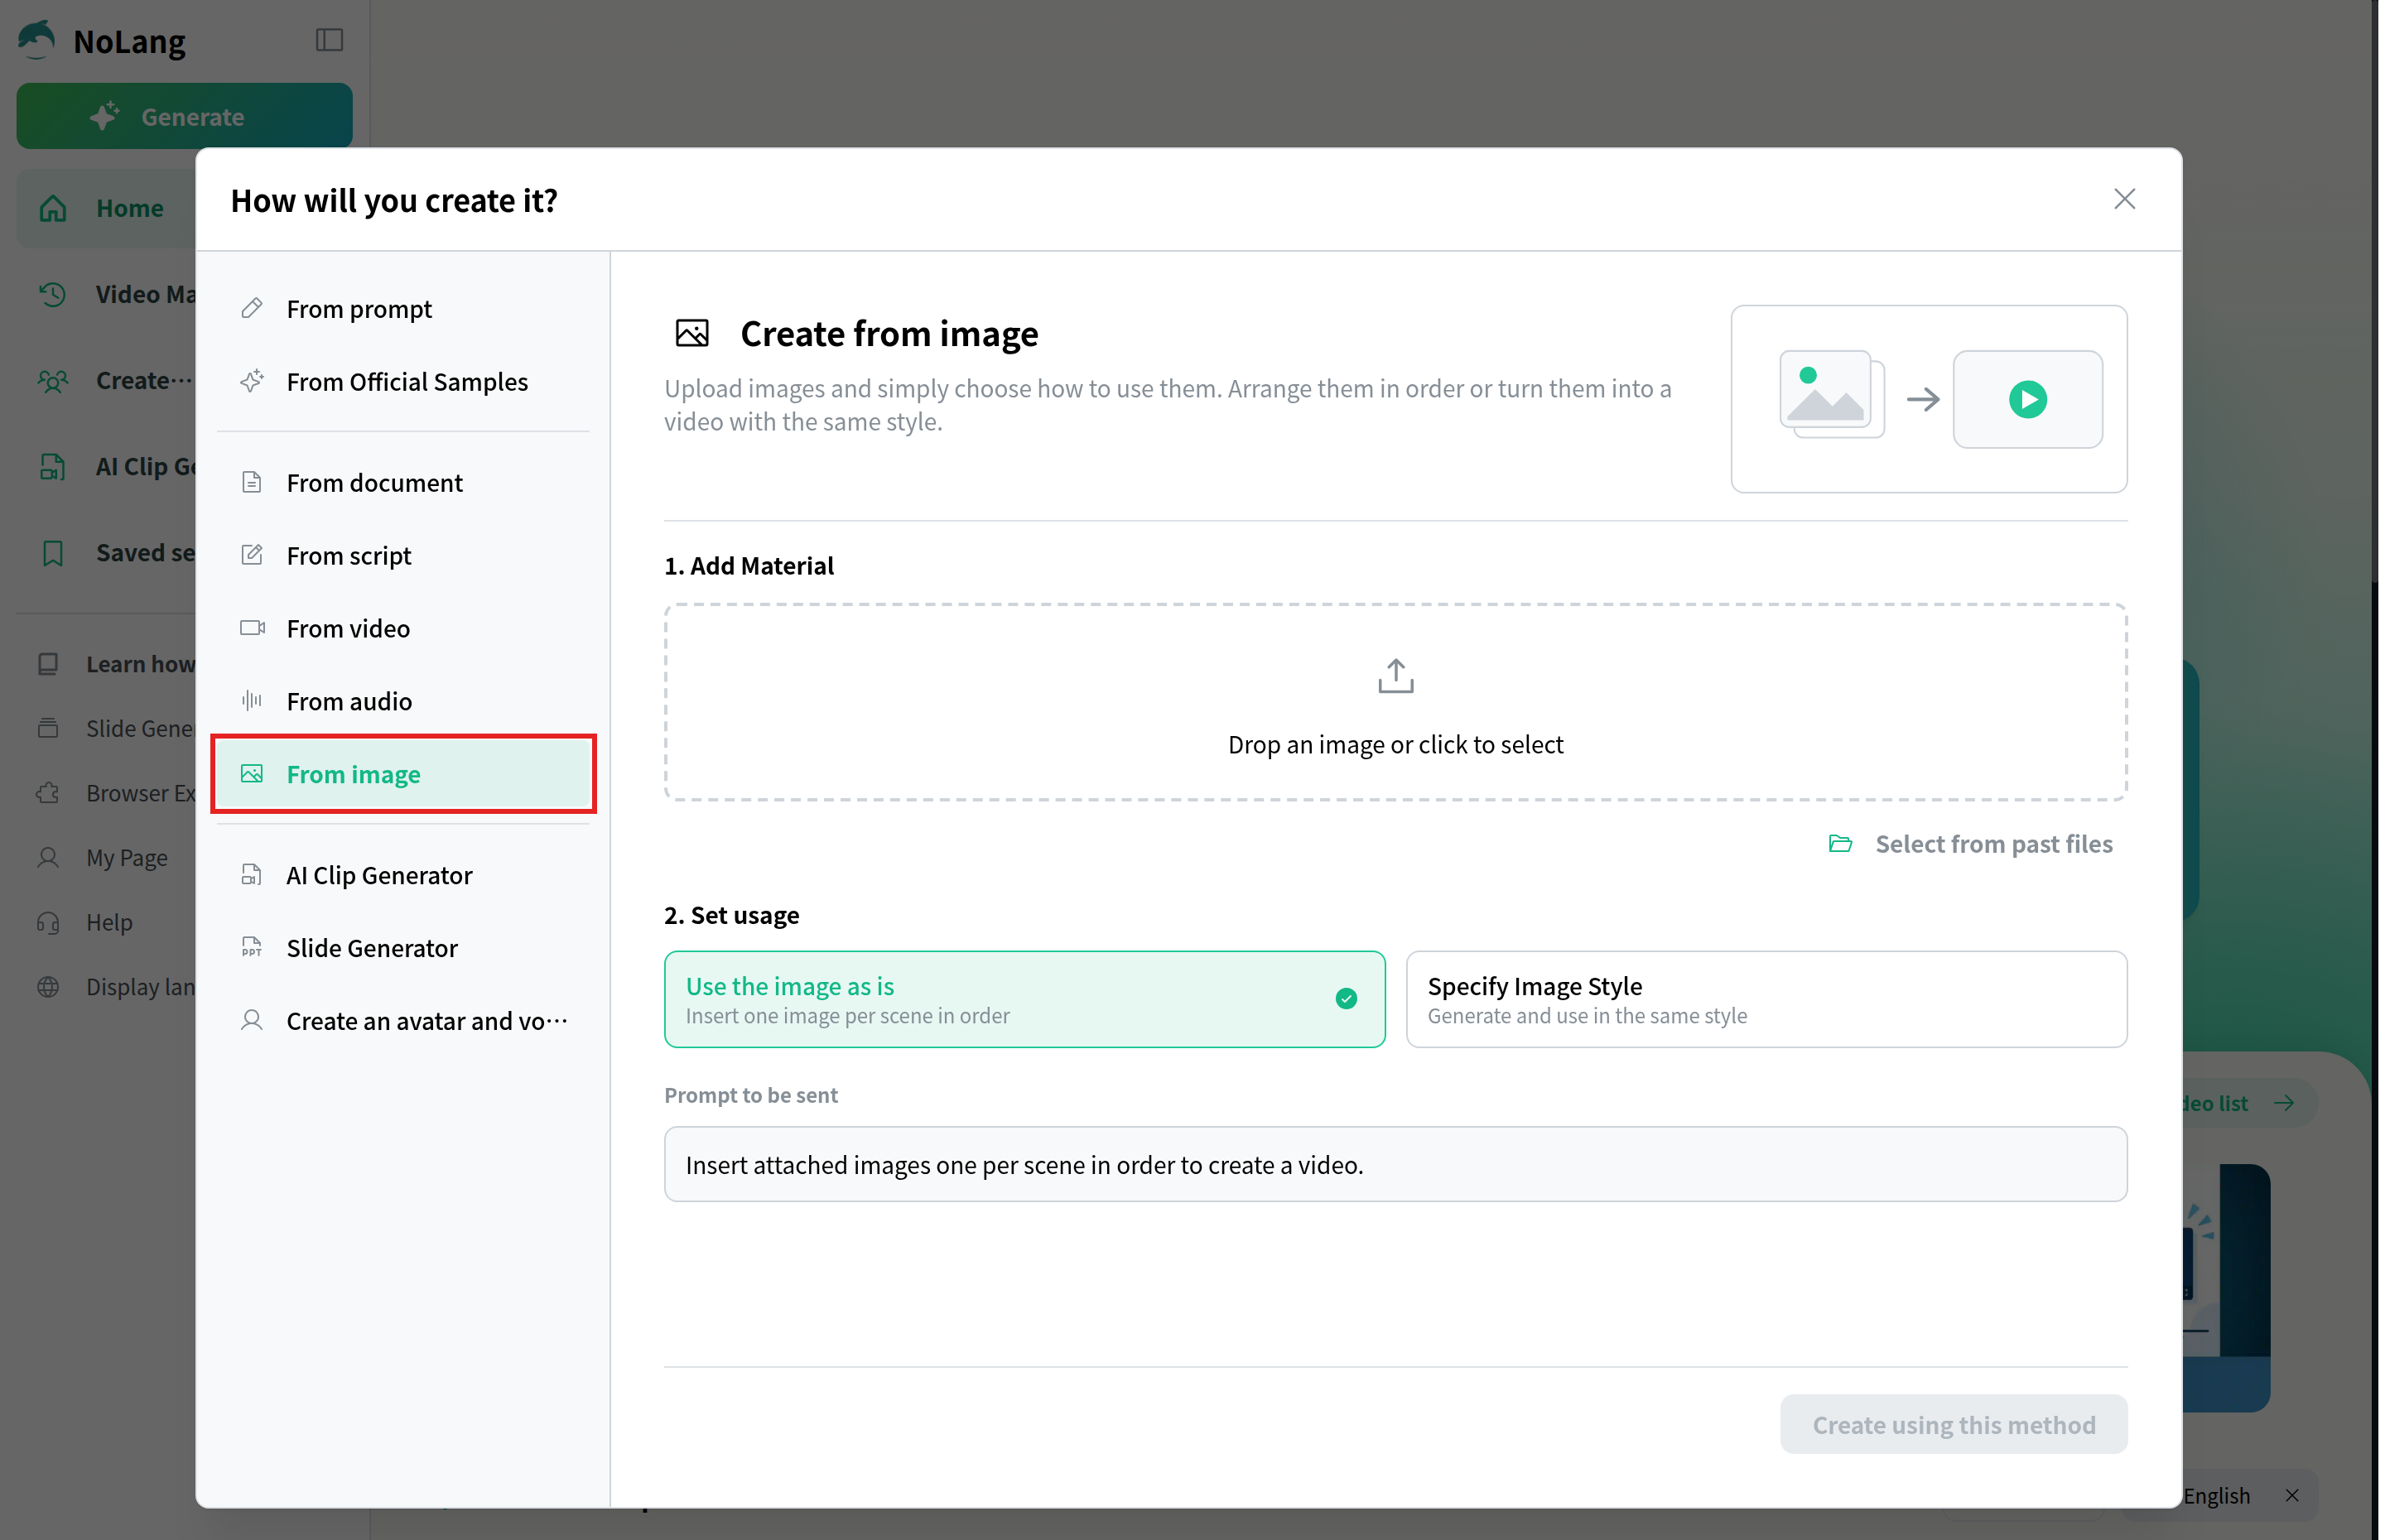
NoLang is an AI video generator that makes narrated videos from text, documents or images. Its From image option takes your photos and asks for a video with one photo per scene, in the order you added them, with narration written and voiced for you. Here is how it works in a desktop browser.
1. Open “From image”
On the home screen, click See more at the end of the row of ways to create. In the “How will you create it?” window, choose From image on the left.
2. Add your photos
Under “1. Add Material”, click the box and choose your photos, already sorted in the order you planned. The files are listed in that order, and the × at the end of a row removes a photo you added by mistake. JPEG, PNG, GIF, WebP and HEIC files are accepted, so photos straight from an iPhone work too.
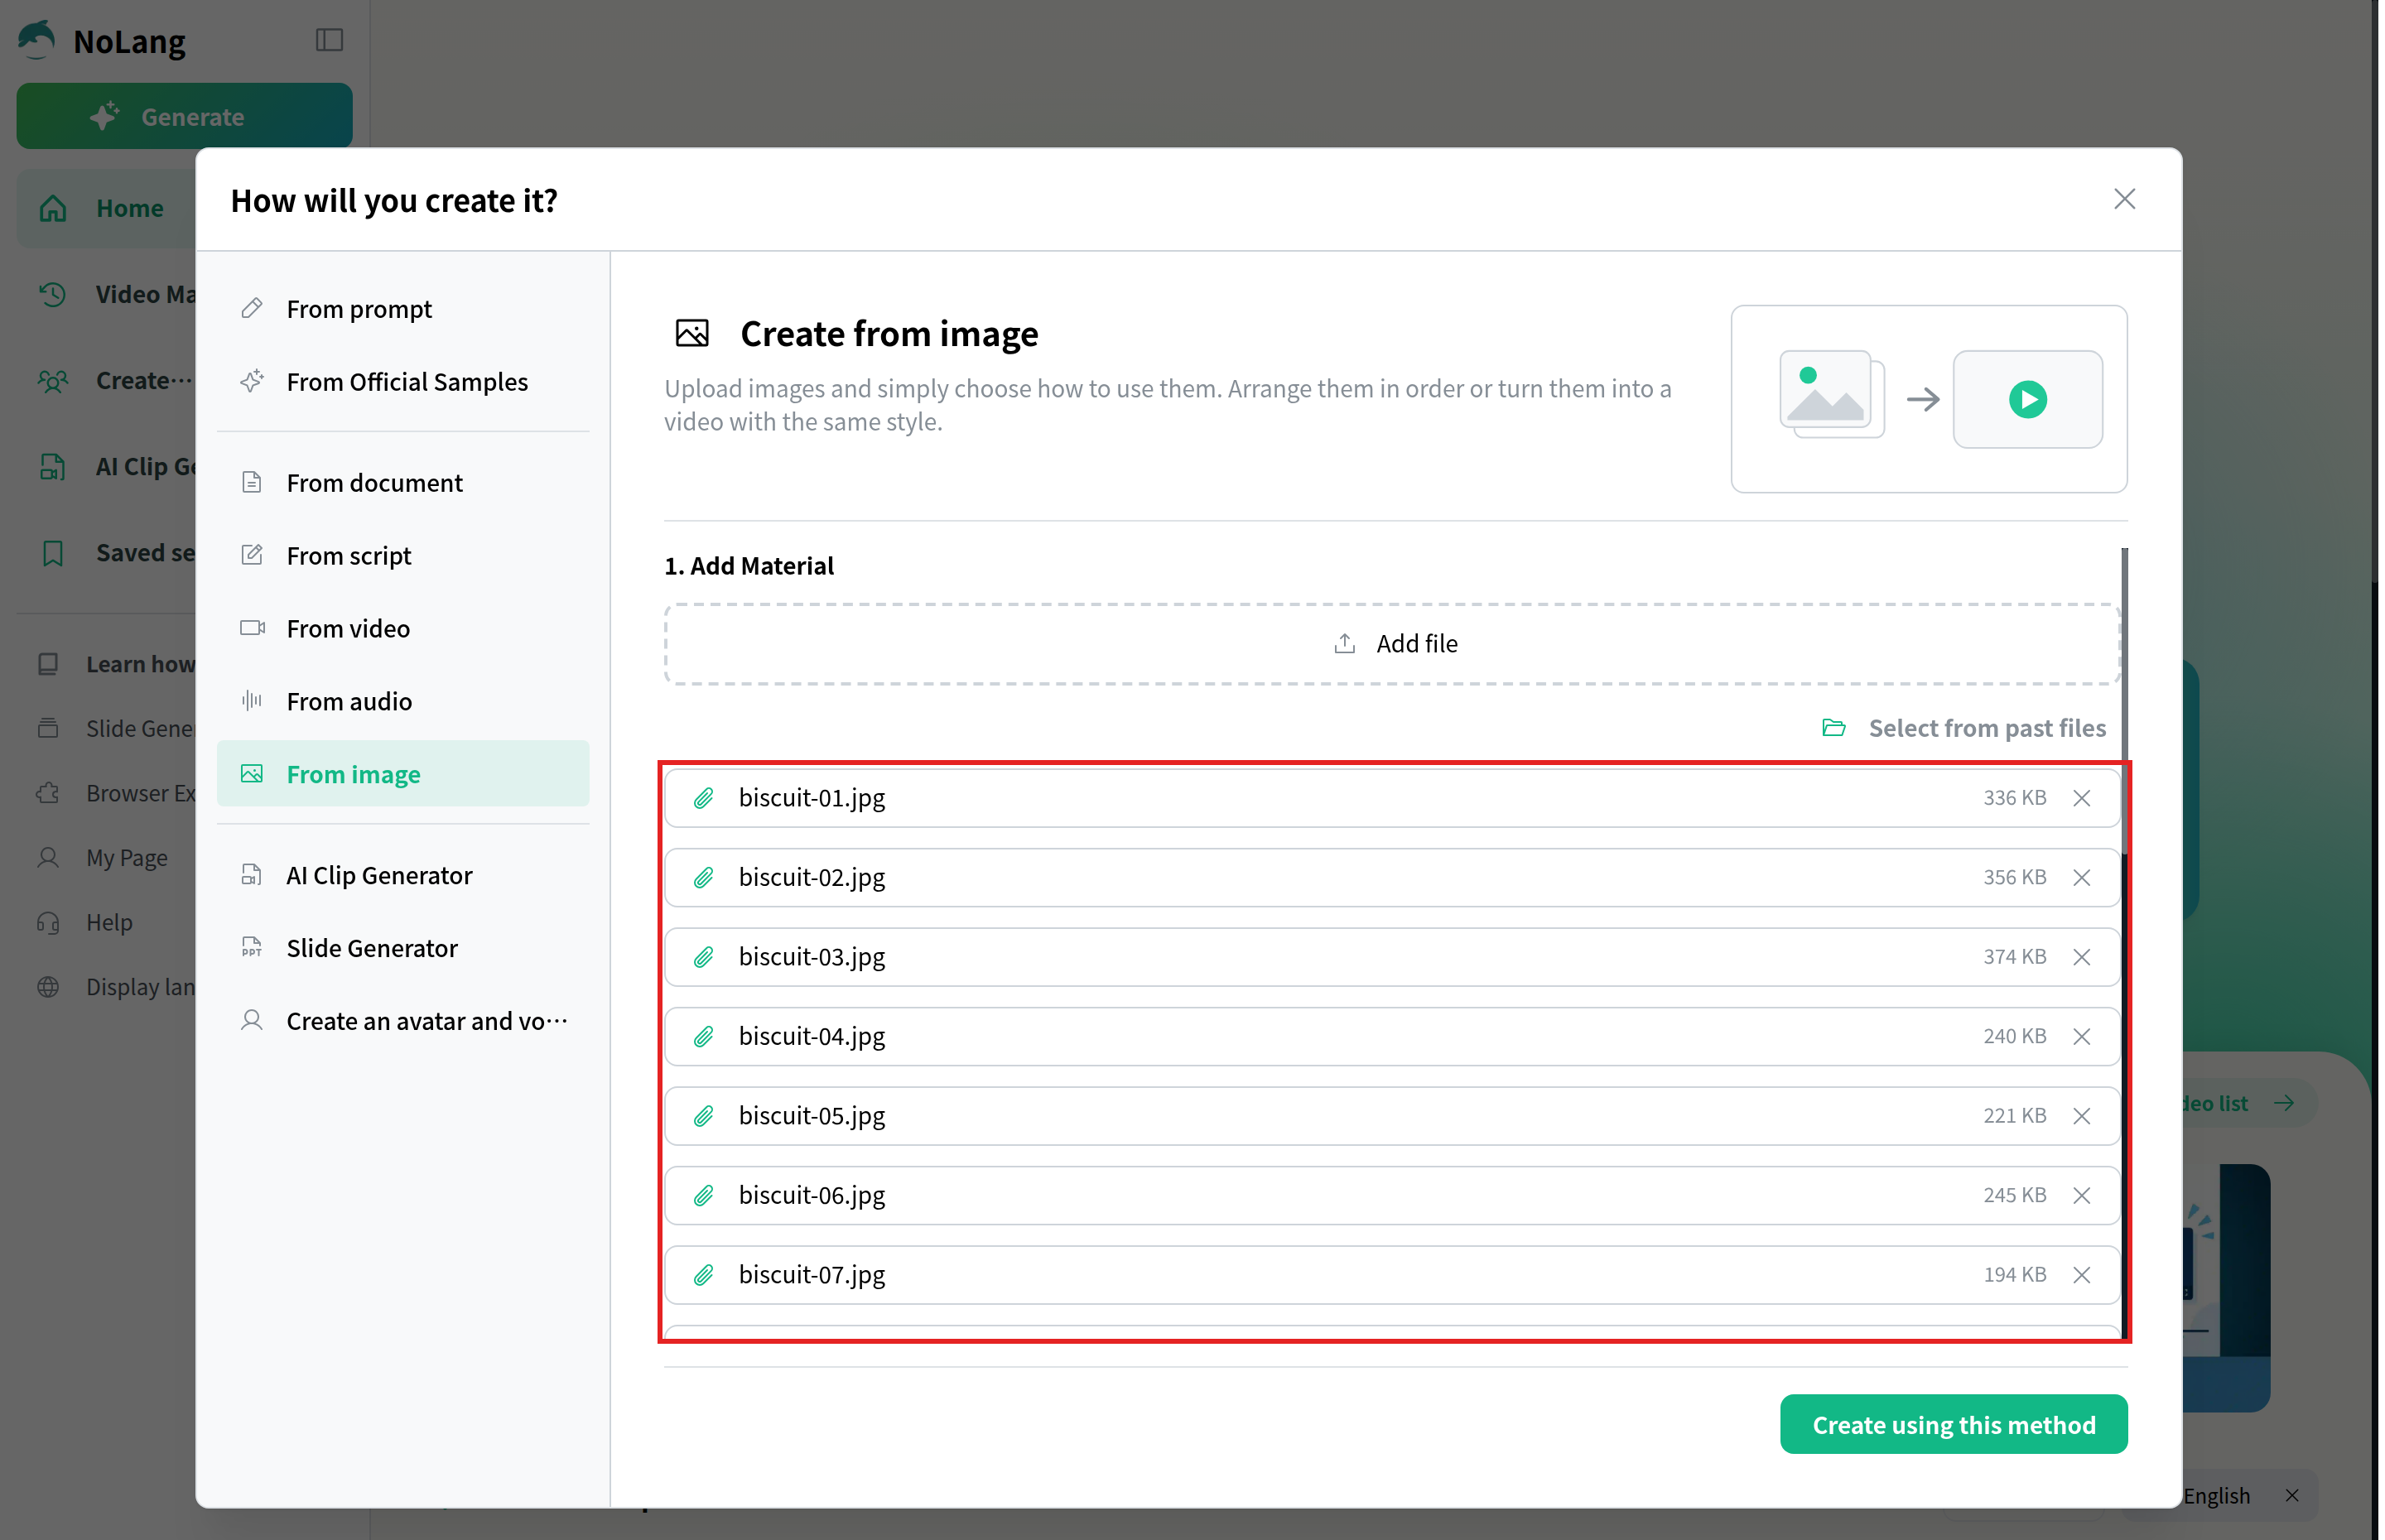
3. Choose “Use the image as is”
Under “2. Set usage”, choose Use the image as is. The “Prompt to be sent” box shows the instruction “Insert attached images one per scene in order to create a video.” Click Create using this method.
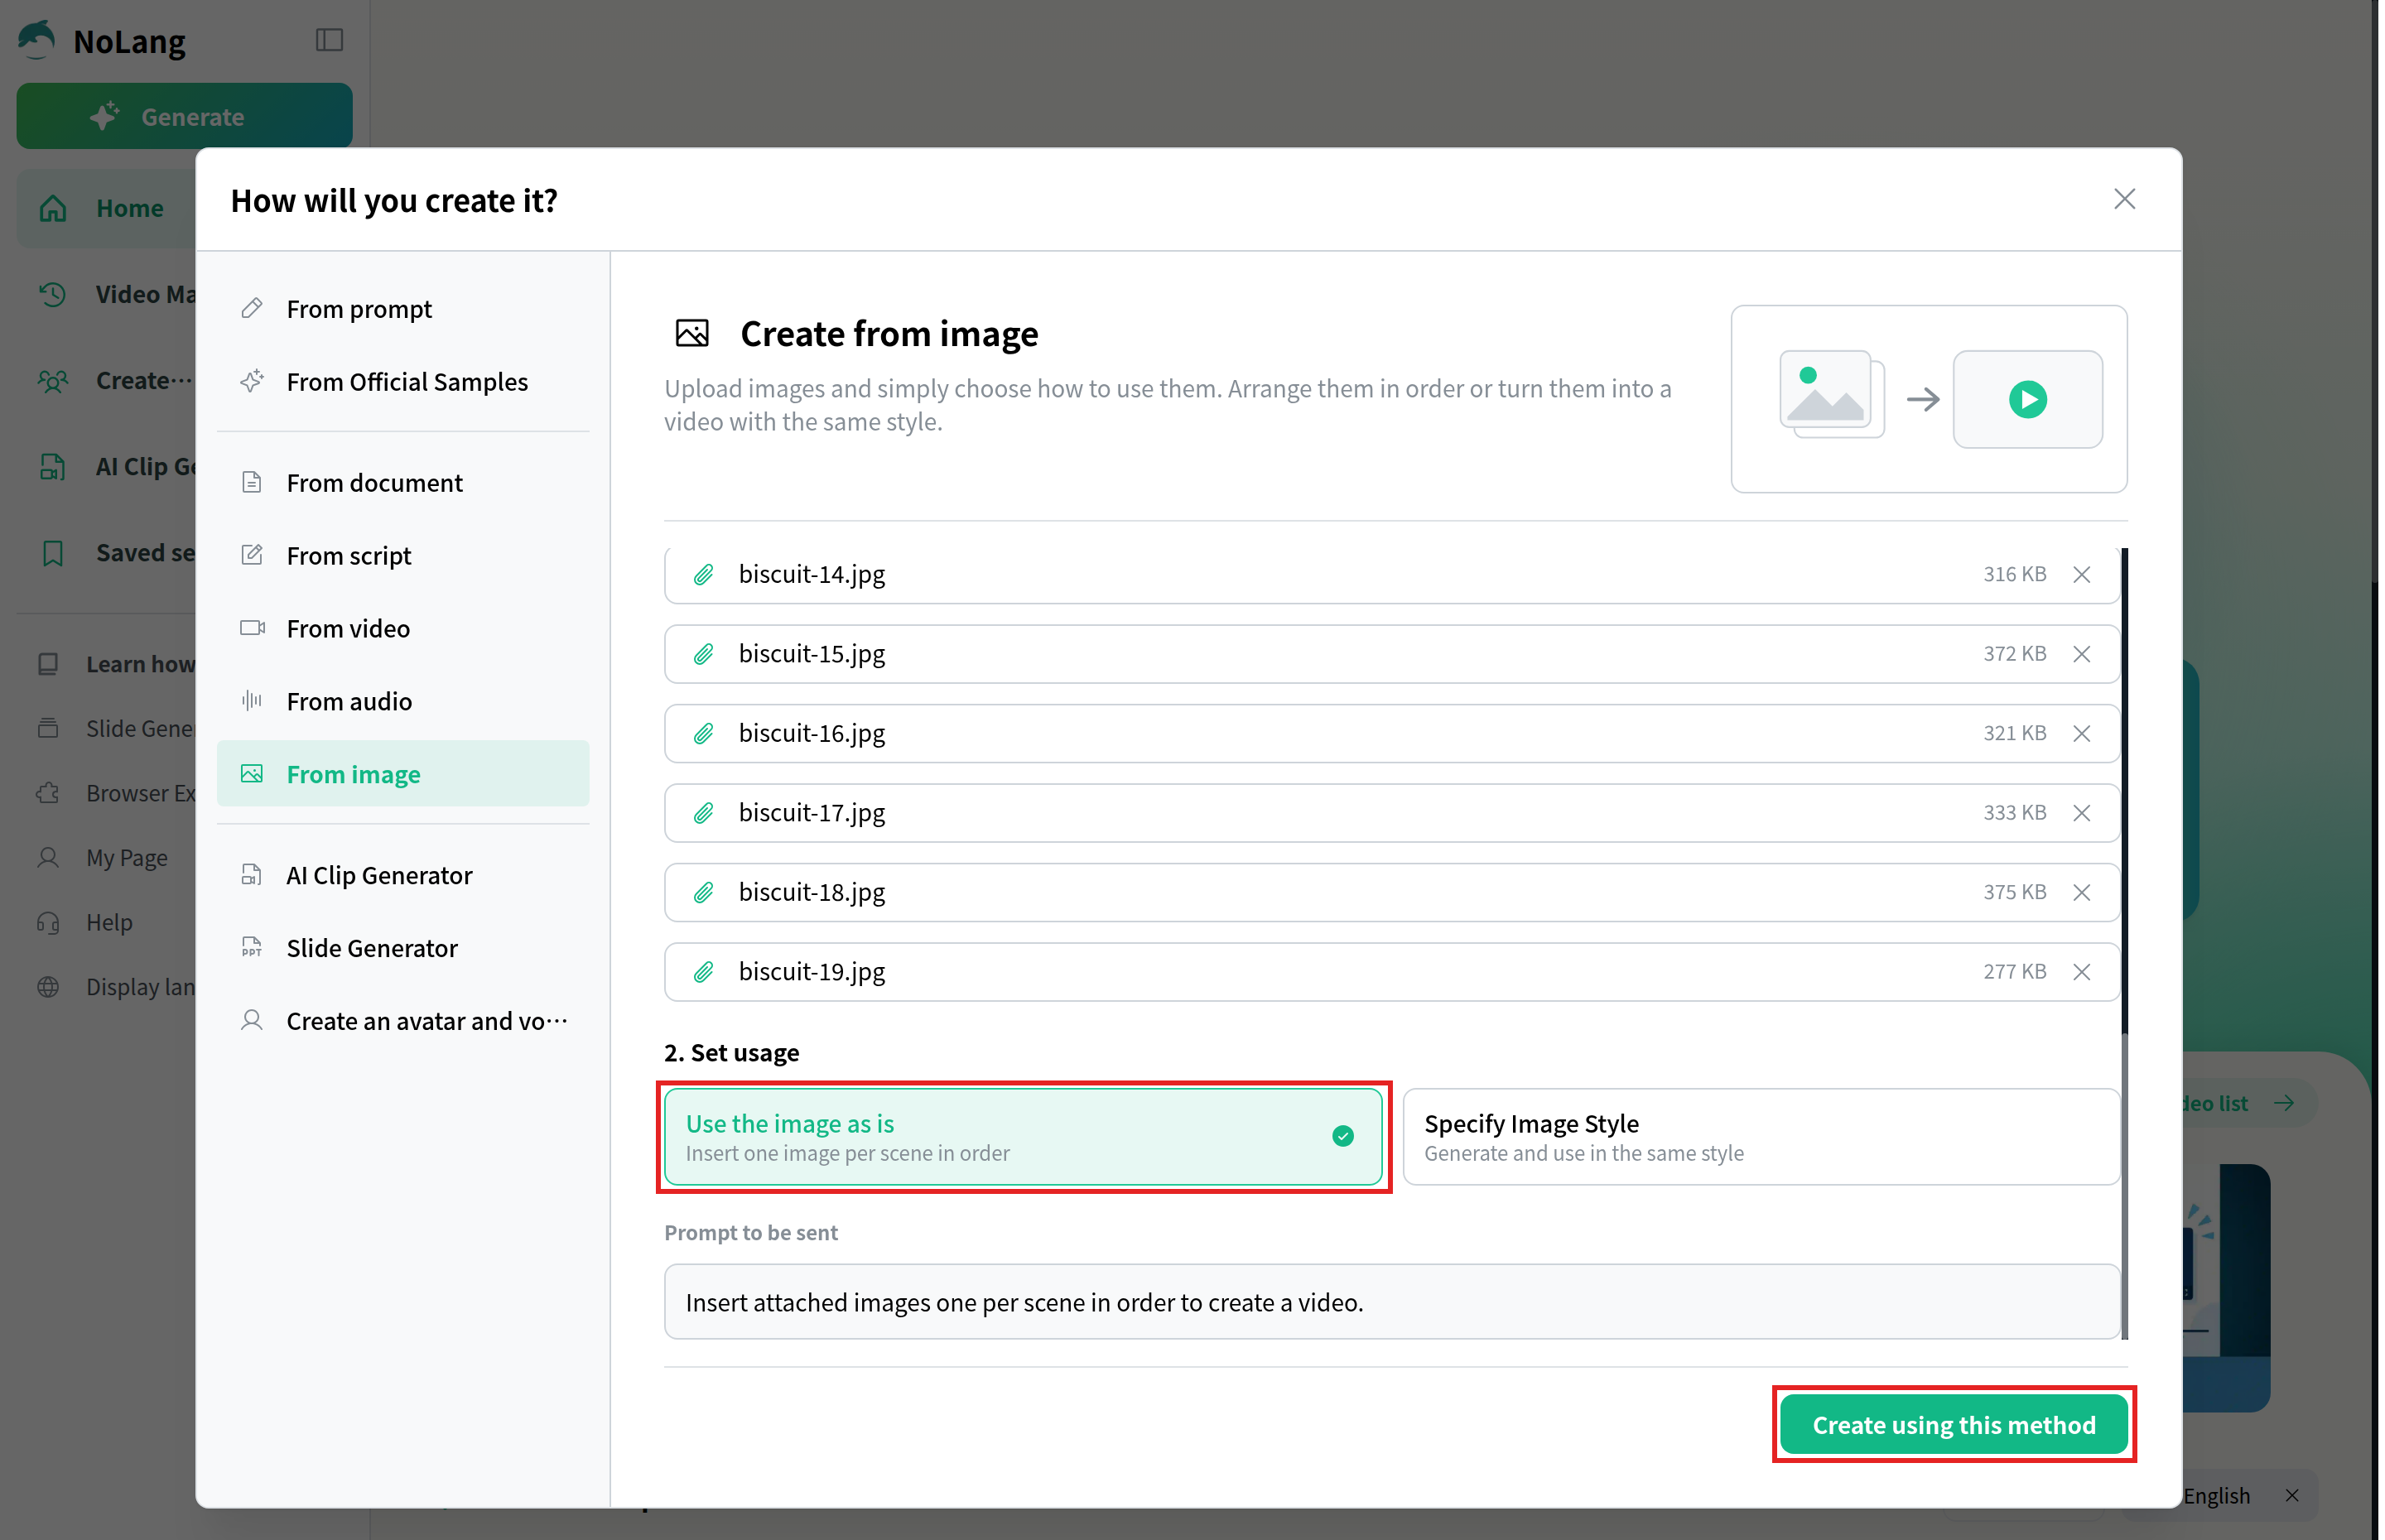
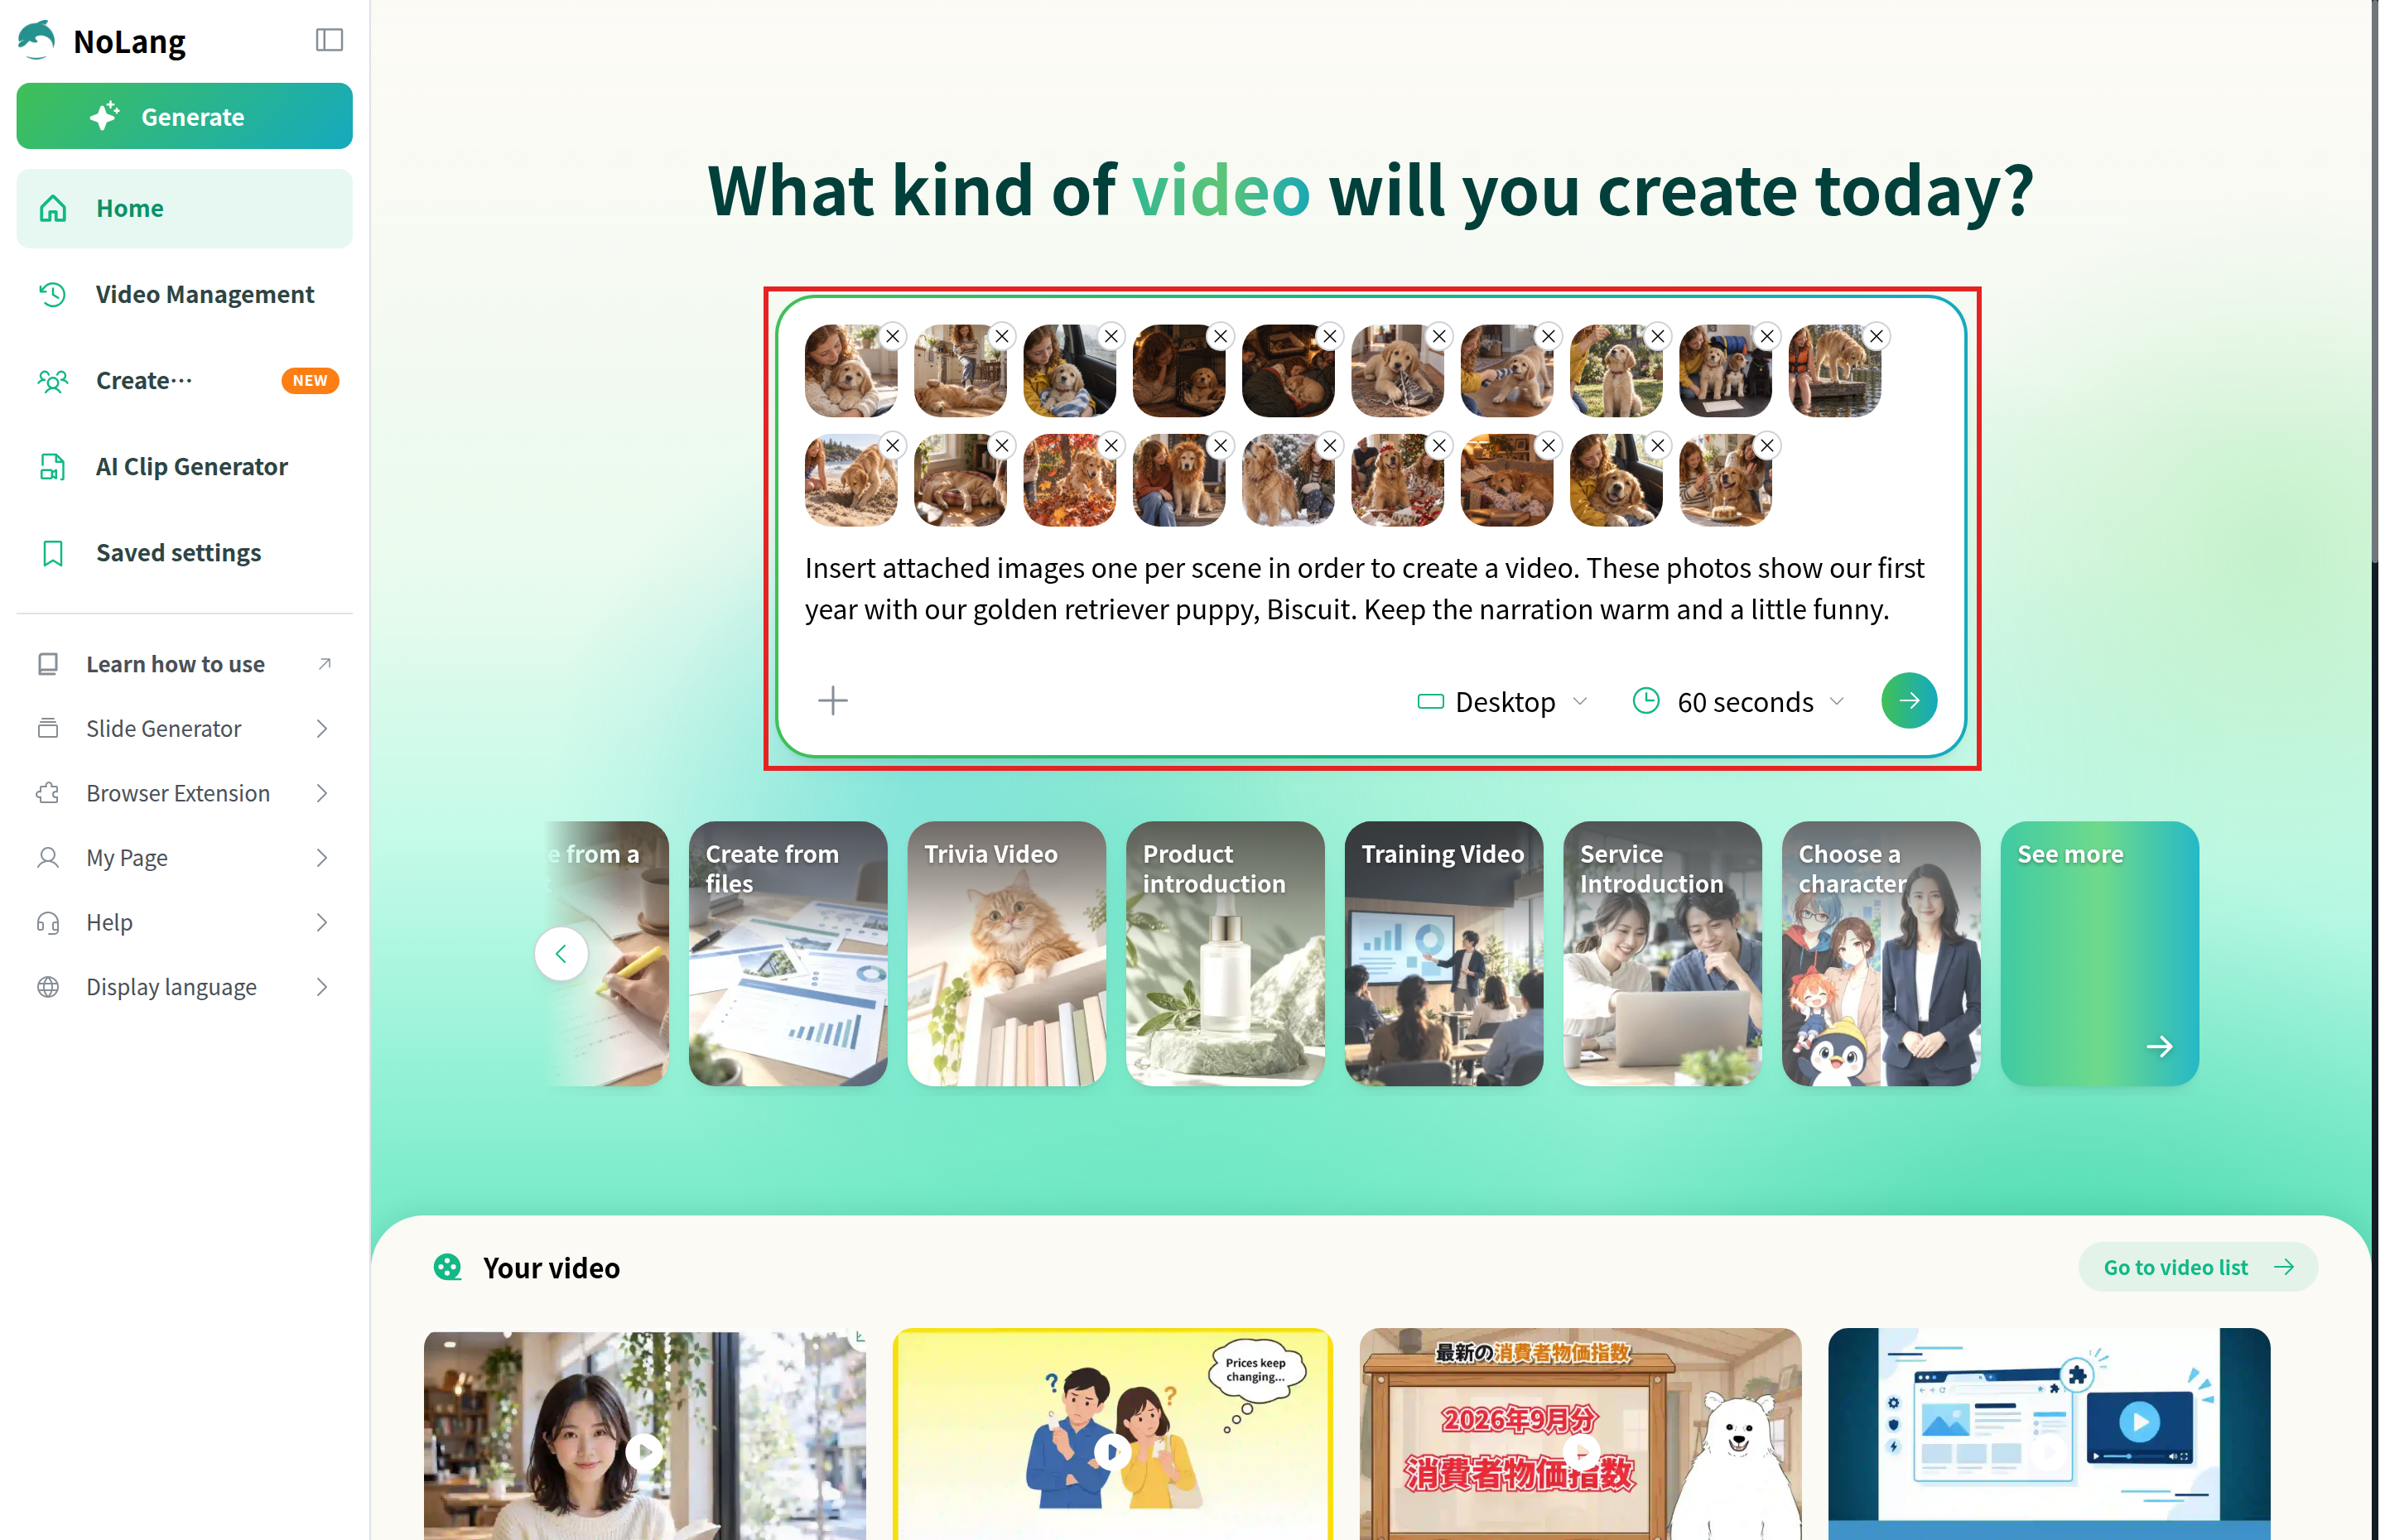
4. Tell it the story, then generate
The instruction and your photos now sit in the input box on the home screen. Add a sentence or two about the story: who is in the photos, what the occasion was and the tone you want, such as warm and funny. Use the first menu under the box to choose Horizontal (16:9) or Vertical (9:16); once chosen, it reads Desktop or Mobile. The second menu sets the length, from 30 seconds to 5 minutes, or Auto. Then click the arrow button to generate the video.
5. Check it in the editor and download the MP4
Open the video and click Edit. The Reading Script column lists each scene’s narration with its length in seconds, so you can reword a line or fix a name, and the panel on the right holds the BGM and image lanes. When you are happy, click Confirm with this content at the top right to apply the changes, then click Download on the video page to save the MP4.
Example: a puppy’s first year in photos
This example is a 95-second narrated slideshow of a family’s first year with their golden retriever puppy, made in NoLang from 27 photos and two short clips. The narration, the layouts for each month and the switch between two music tracks were worked out scene by scene, so it shows a finished result rather than a single run of the steps above. It opens with day one against day 365, moves through the year month by month, and closes on a collage.
A Year in Photos: Narrated Slideshow
A narrated slideshow of our first year with our puppy, using these photos in the order we took them. Open with day one next to today, and end on the same car ride a year later.
The photos in this example are AI-generated pictures of a fictional family and dog. If you want to bring a single photo to life rather than build a slideshow, see image to video.
NoLang also works for slideshow-style videos at work. A shop can turn product and store photos into an introduction video, and a team can turn photos from a company event into a narrated recap, using the same From image steps. You can download our brochure for businesses below, or contact us to talk about using NoLang in your company.
Download the brochure