How to Make an Explainer Video in 6 Steps, with a Script Template
Key takeaways
An explainer video makes one product, service or idea understood in a short video, usually in four parts: the problem, the solution, how it works and a call to action.
Pick the style by the subject. Animated explainers (character animation, motion graphics, whiteboard) show what a camera can't; screencasts suit software.
Six steps: one viewer and one question, a four-part outline, narration and visuals side by side in a script template, a style, production, and a cold review.
The worked example explains two-step verification in 48 seconds from a 134-word script, and you can reuse it as a NoLang template.
SHARE
An explainer video is a short video that makes one product, service or idea easy to understand by pairing narration with visuals. Most follow the same order: the problem, the solution, how it works, and what to do next.
This guide covers what an explainer video is, the styles you can choose from (animated explainers included), and a six-step way to make one. Each step is shown on a single worked example, a 48-second video that explains how two-step verification protects an account, so you can see how a script turns into scenes, and you can reuse the finished video as a template.
What is an explainer video?
An explainer video answers one question a viewer already has, such as “what does this product do for me?” or “how does this work?”, in the time it takes to watch a short clip. A narrator explains, and the screen shows what the words describe: the product, a diagram, an icon moving from one place to another.
Most explainer videos are built on four parts:
Problem: the situation the viewer recognizes.
Solution: the product, feature or idea that changes it.
How it works: the few steps or parts the viewer needs to understand.
Call to action: the one thing to do after watching.
The format is used wherever someone has to understand something before they act: on a product page, in a welcome email for new customers, after a sales call, or in an internal rollout of a new tool or policy.
Explainer videos are often confused with other short business videos. The difference is in what the viewer can do afterward.
Video
Its job
After watching, the viewer can
Explainer video
Make one product, service or idea understood
Say what it is, why it matters and how it works
Product demo
Show the product in use, feature by feature
Picture themselves using it
Promo or ad
Win attention and a click
Remember the brand and the offer
Instructional video
Teach a task step by step
Do the task themselves
If your goal is for viewers to repeat a task on their own, such as setting up a device or filing an expense report, see how to make an instructional video. If you are explaining your own company’s service to buyers, how to make a service explainer video covers the types that fit each stage of a sale.
Explainer video styles, including animated explainers
The style is what the viewer looks at while the narrator talks. Choose it by what the subject is, not by what looks impressive.
Style
What’s on screen
Works best when
Character animation
Illustrated people acting out a story
The problem is a human situation
Motion graphics
Icons, shapes and short text that move
The subject is a process or system you can’t film
Whiteboard
Drawings that appear as the narrator talks
You teach a concept one step at a time
Kinetic typography
The words themselves, animated
The message is short and may play without sound
Screencast
A recorded software screen
The interface is the point
Live action
Filmed people and products
The product is physical, or a face builds trust
Mixed media
Footage with animated labels and arrows
You have footage but need to explain what’s in it
An animated explainer, or explainer animation, is an explainer whose visuals are drawn or generated rather than filmed. Character animation, motion graphics and whiteboard are its common forms. Animation’s advantage is that it can show what a camera can’t: a password traveling to a server, a payment moving between accounts, a step that happens inside a machine. Live action and screencasts need something to point a camera at; animation needs only a clear idea of what each scene should show.
One video can mix styles. A software explainer might open with a short animated scene of the problem and switch to a screencast for the steps.
How to make an explainer video in 6 steps
The steps below go from an idea to a finished video:
Choose one viewer and one question.
Outline the problem, the solution, how it works and the call to action.
Write the narration and the visuals side by side.
Pick a style that shows what the narration says.
Turn the script into a video, or start from a template.
Watch it cold, then revise.
Each step uses the same example: a video that explains to everyday account holders how two-step verification keeps a stolen password from being enough to sign in. A bank, a software company or an IT team could send a video like this to get people to turn a security feature on.
Step 1: Choose one viewer and one question
Before writing anything, decide who will watch and which single question the video answers. “Explain account security” could fill an hour. “Why does two-step verification stop someone who has my password?” fits in a minute.
Decide
In the example
Viewer
People who sign in to online accounts and haven’t turned on two-step verification
What they already know
They use passwords and have seen a “verification code” prompt
The one question
Why can’t someone sign in with my stolen password once two-step verification is on?
The action at the end
Turn it on, starting with their email account
Writing down what the viewer already knows tells you where to start. These viewers don’t need to be told what a password is, but they may not know why passwords end up in the wrong hands, so the video starts there.
Step 2: Outline the problem, the solution, how it works and the call to action
Map the four parts to your topic before you write full sentences. Each part should answer the question the viewer has at that moment.
Part
The viewer’s question
In the example
Time
Problem
Why should I care?
A password is the only lock, and passwords leak
0:00–0:12
Solution
What fixes it?
Two-step verification adds a second check
0:12–0:17
How it works
How does it fix it?
Password, then a one-time code; a thief stops at step two
0:17–0:40
Call to action
What do I do now?
Turn it on, starting with email
0:40–0:48
Nearly half of the 48 seconds goes to “how it works”. The problem only needs to be specific enough for the viewer to recognize it, and the call to action should be a single step. In the finished video, each part is also labeled on screen (The problem, The fix, How it works, Why it works, Do this now), so a viewer who looks away for a moment can tell where they are.
Step 3: Write the narration and the visuals side by side
An explainer script has two tracks: what the viewer hears and what the viewer sees. Writing them in the same row keeps each sentence tied to a picture, and shows you early where a line has nothing to show or a scene has too much to read.
Here is a script template you can copy:
Title:Viewer:The one question:The action at the end:Part | Scene | Narration (what the viewer hears) | On screen (what the viewer sees)Problem | 1 | |Solution | 2 | |How it works | 3 | |How it works | 4 | |Call to action | 5 | |
This is the example’s script. The narration was used word for word; the start times and the on-screen column describe the finished video.
Start
Narration
On screen
0:00
Your password is the only thing standing between a stranger and your account.
“One password, one lock”: a padlock beside a sign-in form, then a hooded stranger
0:04
And passwords leak. They turn up in data breaches, get typed into fake sign-in pages, and get reused across sites.
“Passwords leak.”: Breaches, Fake pages and Reuse appear one by one
0:12
Two-step verification adds a second check that a stolen password can’t pass on its own.
A shield, then “Add a second check”: a stolen password passes the first lock and fails the second
0:17
Step one: you enter your password, just like before.
“Step 1: Your password”: the password field fills in
0:20
Step two: the site asks for a one-time code from an app on your phone. Type it in, and you’re signed in.
“Step 2: A one-time code”: an authenticator app’s code goes into the form, then “Signed in”
0:27
Someone who stole your password gets stuck at step two. Without your phone, they don’t have the code.
“A password alone isn’t enough”: the stranger is stopped at step 2
0:33
Your password is something you know. Your phone is something you have. Two-step verification asks for both.
Two cards, “Something you know” and “Something you have”
0:40
Turn it on in your account’s security settings, and start with your email, because it can reset your other passwords.
“Turn it on. Start with email.”: a security setting switches on, and email links to other accounts
A few habits make the script easier to watch:
Write for the ear. Use short sentences and “you”. The viewer can’t scroll back to reread a long sentence the way a reader can.
Give each scene one idea. If a sentence needs two pictures, split it into two scenes.
Keep on-screen text to a few words. The narration carries the explanation; the text marks the point to remember, such as “Step 2: A one-time code”.
Check facts against a source before production. The example’s split between “something you know” and “something you have” follows how NIST describes authentication factors in its Digital Identity Guidelines.
Estimate the length from the word count. The example’s narration is 134 words and the finished video runs 48 seconds, a pace of about 170 words a minute including the pauses between scenes. Published advice on explainer length ranges from about 40 seconds to two minutes; at the example’s pace, a 60-second video holds about 170 words of narration. If your draft runs much longer, the video is probably answering more than one question, and splitting it into two videos is usually clearer than speeding up the narration.
Step 4: Pick a style that shows what the narration says
Go through the script line by line and ask what the viewer needs to see to follow that line. The answers point to a style.
Nothing in the example can be filmed in a useful way: a password leaking, a code being checked, a second lock. So it uses motion graphics. A padlock stands for each check, a hooded figure for the stranger and a phone for the second factor, and their positions carry the explanation: the stranger’s stolen password opens the first lock and fails at the second. A screencast of a real sign-in page would have shown one company’s screen rather than the idea, and live action would have needed a staged scene for something that happens on a server.
Whatever the style, keep the layout steady from scene to scene. In most scenes of the example, the part label sits at the top left, the heading at the top center and the subtitles at the bottom, so when the diagram in the middle changes, the viewer’s eyes go straight to what changed.
Step 5: Turn the script into a video, or start from a template
With a script and a style, you can produce the video in whichever way fits your team: animate it yourself in a video editor, brief a studio, or generate it from the script with an AI video tool. The example was made in NoLang from the script in step 3 and saved as a template, so you can open it and replace the topic with your own.
How Two-Step Verification Protects Your Account
Explain to everyday account holders how two-step verification keeps a stolen password from being enough to sign in, and end by asking them to turn it on, starting with email.
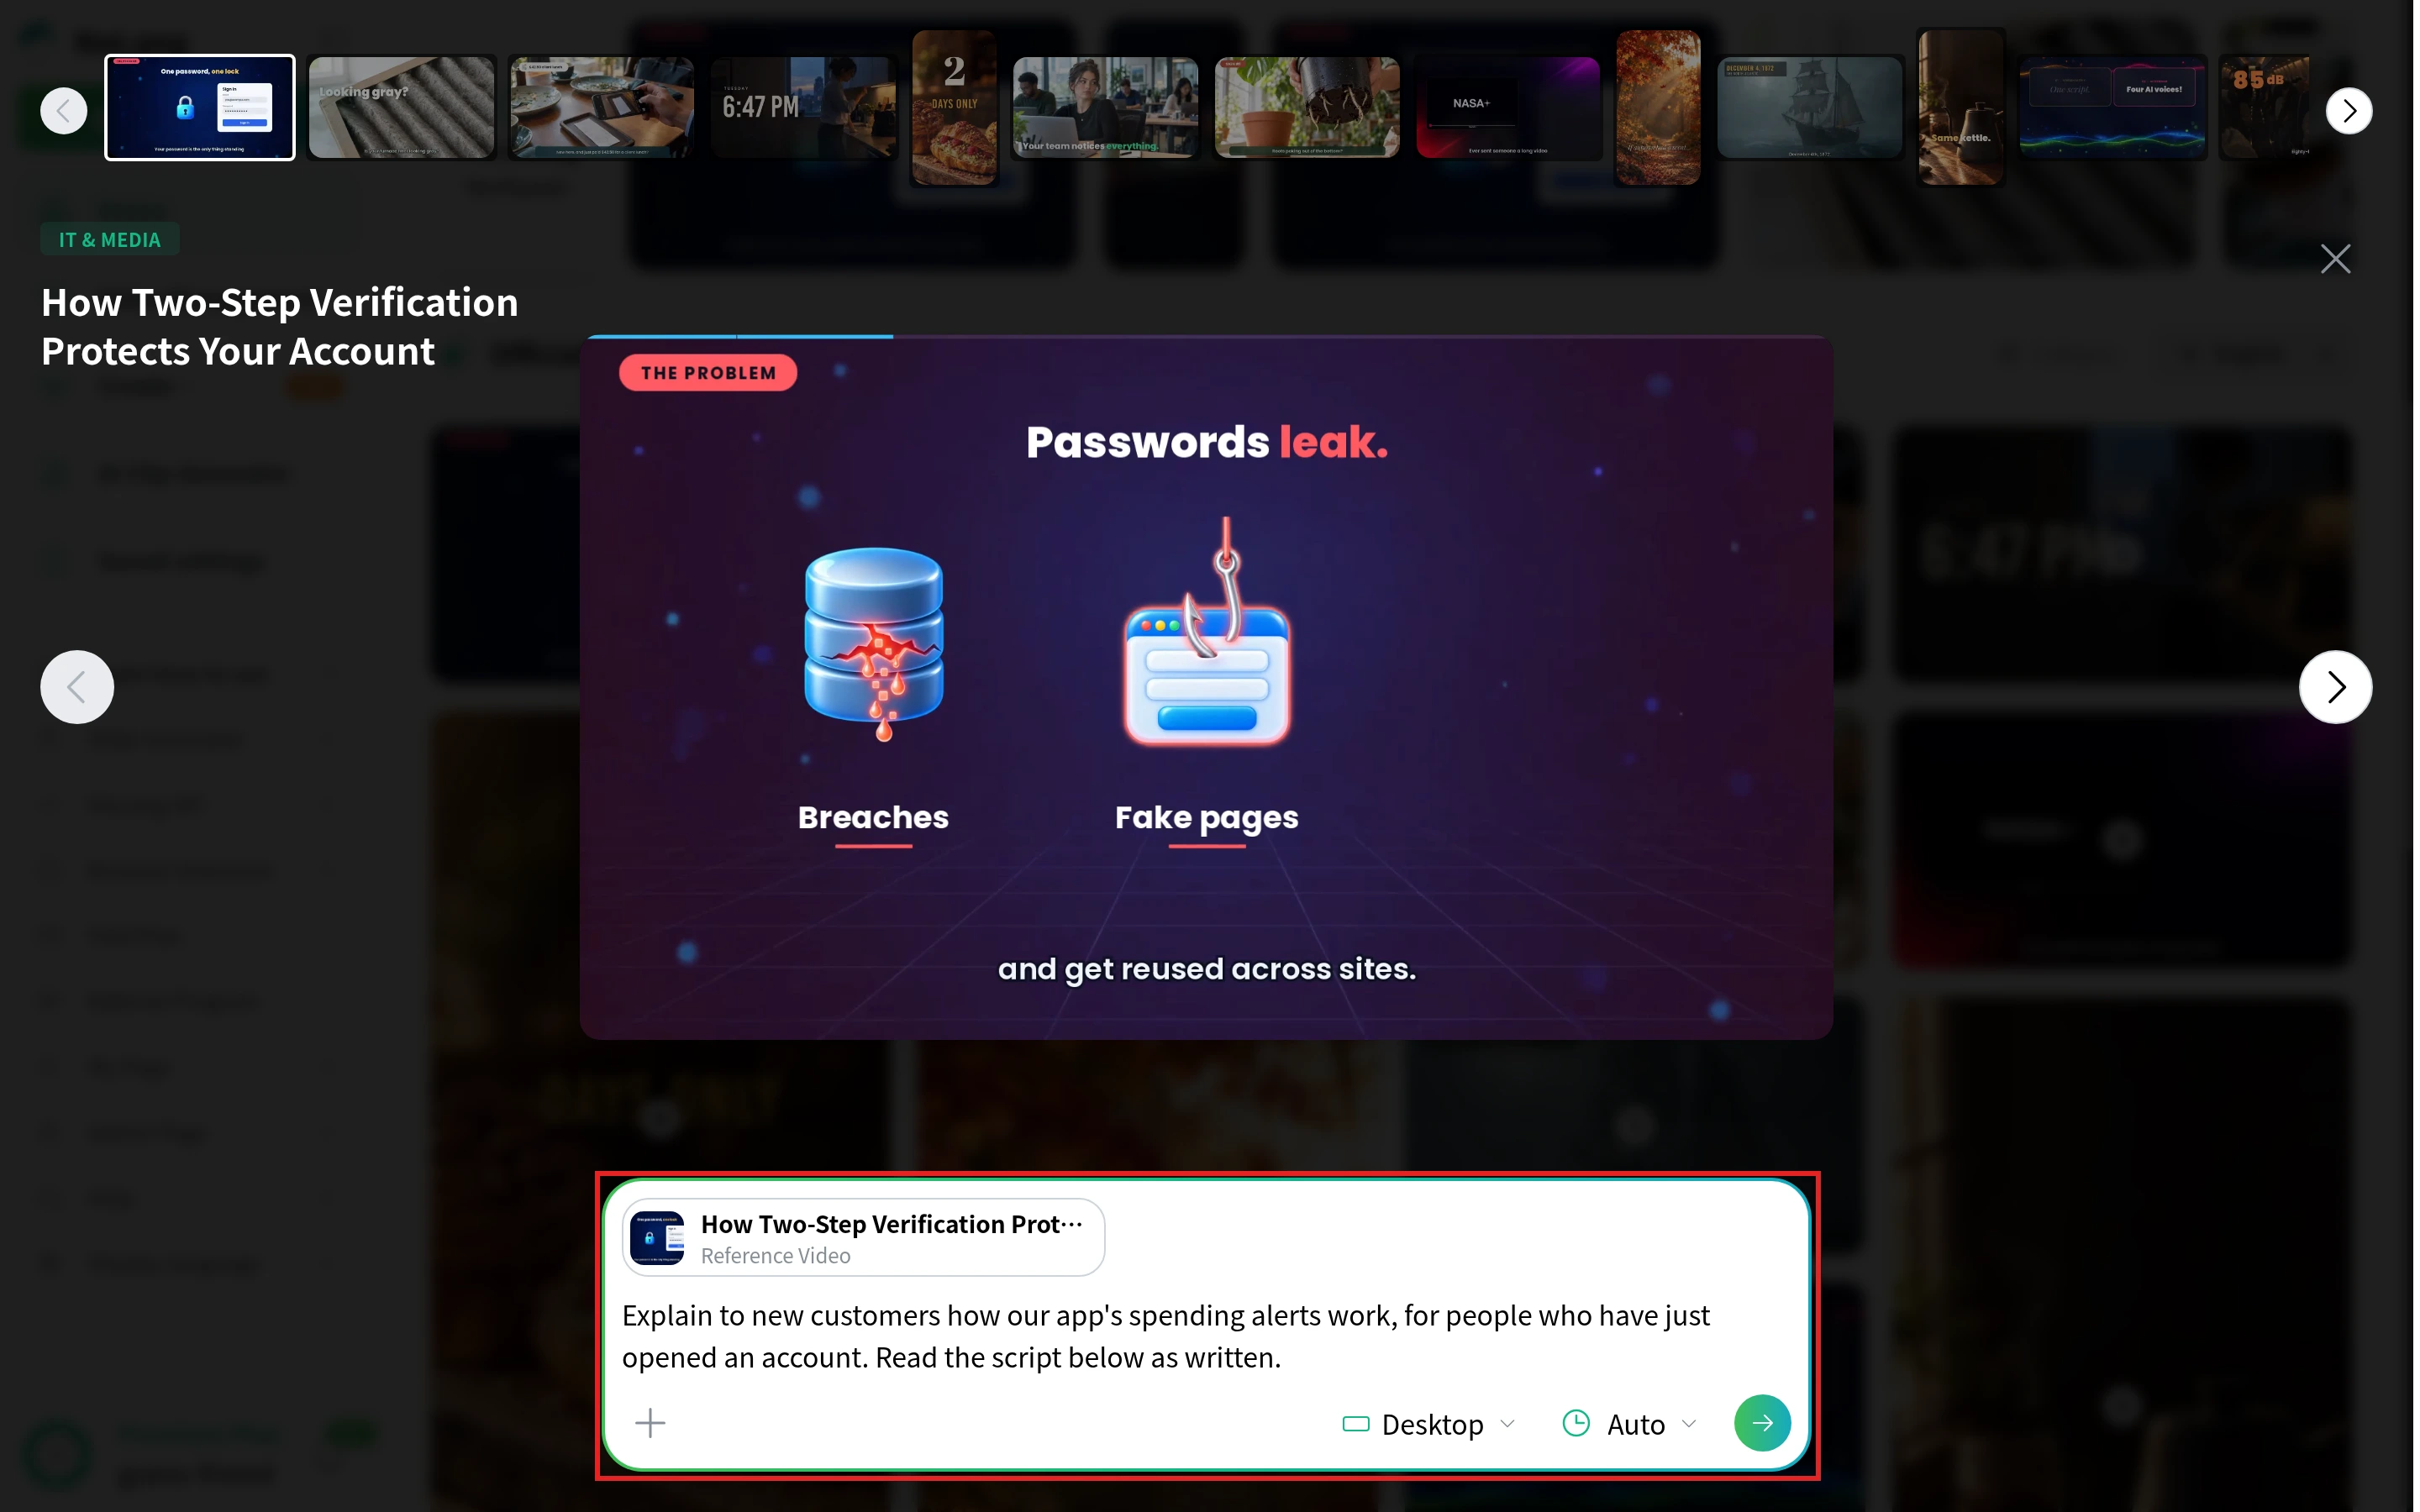
Click Create a Video with This Template. NoLang opens with the example attached to the input box as a Reference Video.
In Video Generation Instructions, describe your topic and viewer, and paste your script if you have one.
Choose the orientation (Horizontal 16:9 for a website or YouTube, Vertical 9:16 for social feeds) and the duration (Auto, or a length from 30 seconds to 5 minutes).
Click the arrow button (Generate a video).
The red box marks the input box after opening the example’s template. The example sits at the top as the Reference Video, and your own instructions go underneath, followed by the orientation (Desktop), the duration (Auto) and the arrow button.
You can also start from the home screen. Create from a script takes your script, then asks you to pick a template before generating. Create from files does the same with a PDF or PowerPoint (.pptx) file you already have, followed by a short instruction about the video you want.
Step 6: Watch it cold, then revise
When the first version is ready, watch it from the start as if you had never seen the script. You know what every scene is supposed to mean, so you will fill gaps the viewer can’t. If you can, show it to someone who fits the viewer from step 1 and ask what the video was about and where they got lost.
Check
What to look for
The first five seconds
Does the opening scene make clear what the video is about?
Terms
Is every term the viewer might not know explained the first time it appears?
On-screen text
Can each scene’s text be read before the scene changes?
Timing
Does the picture change when the narration moves to the next idea?
Accuracy
Do the facts still match the source you checked in step 3?
The ending
Is there one clear action, and is it the one from step 1?
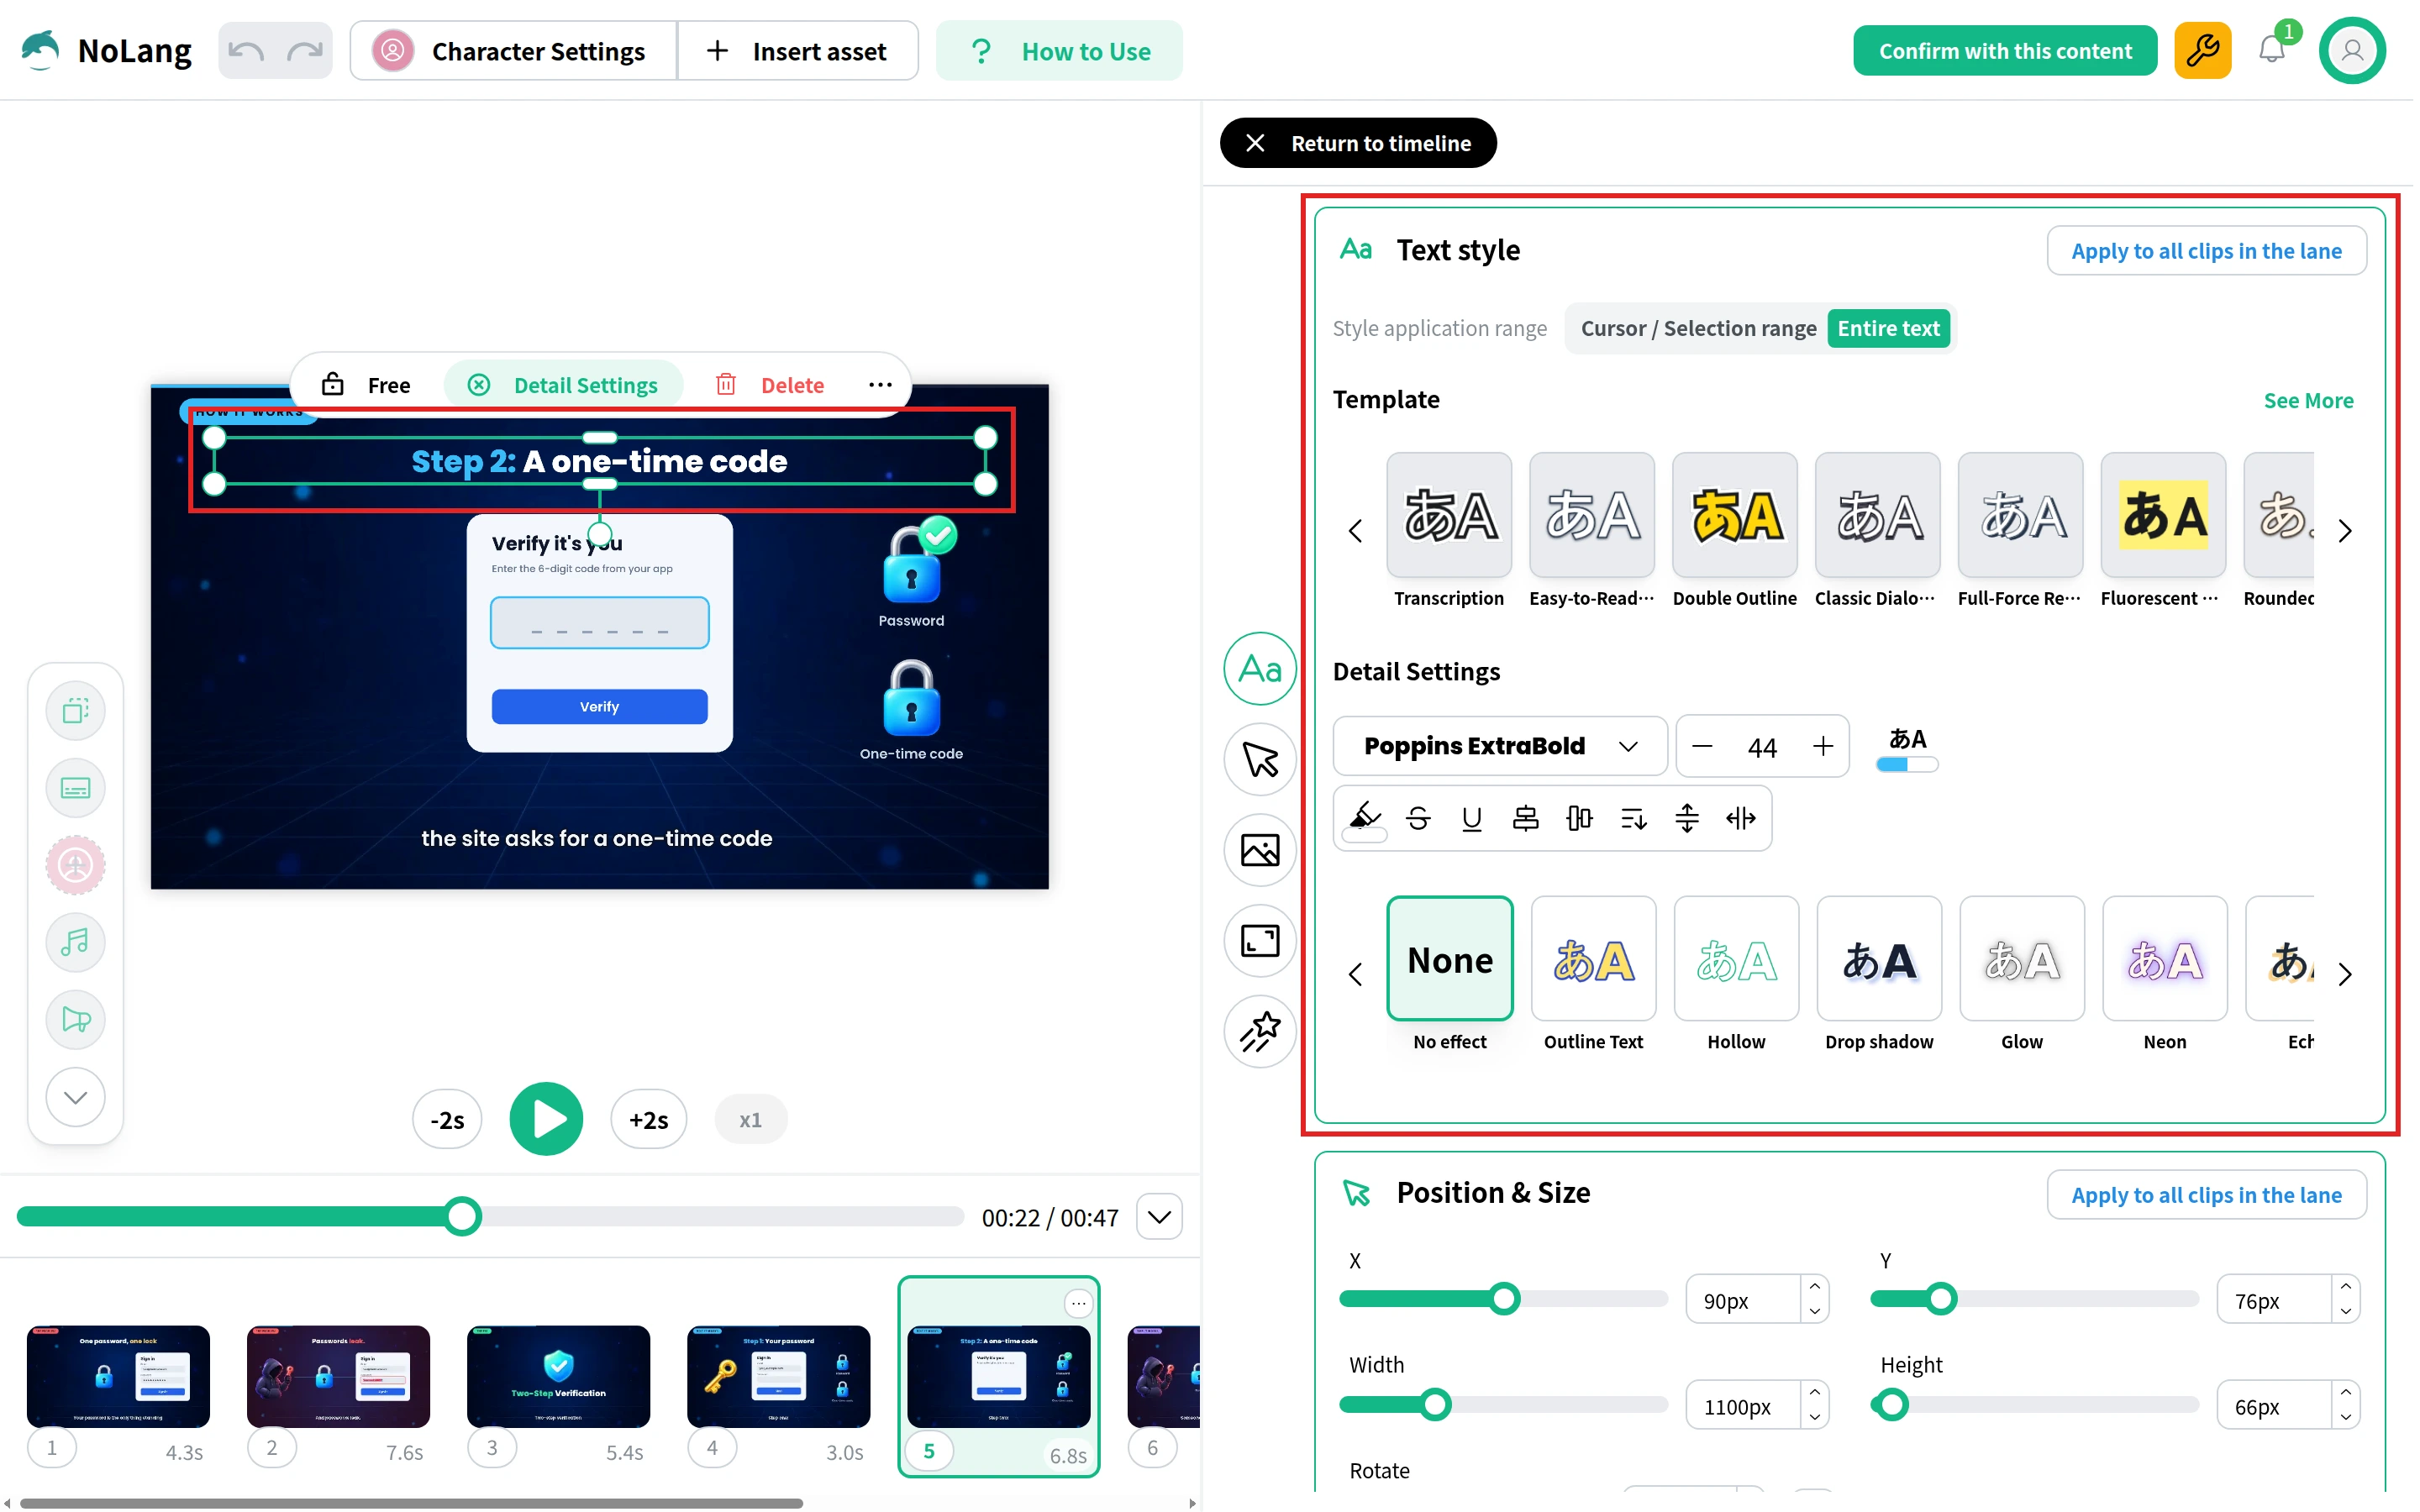
Most fixes from this review are small: a word in a heading, the size of a label, the position of an icon. In NoLang you make them in the video editor rather than starting over. Pick the scene from the thumbnails along the bottom, then double-click the text in the preview to type the correction. To change how the text looks, click it once and choose Detail Settings; the Text style panel sets the font, size and effects, and Position & Size below it moves or resizes the element.
Here the heading “Step 2: A one-time code” is selected in the fifth scene. The red boxes mark the heading and the Text style panel that opened from Detail Settings.
After a fix, play the scenes before and after it as well, to make sure the explanation still flows.
Make your first explainer video
Start with one viewer and one question, outline it as problem, solution, how it works and call to action, and write the narration and the visuals in the same rows. With that script, the production step becomes a matter of choosing how to build the scenes, and the review step has something concrete to check against.
With NoLang, a team can turn a script, a PDF or a PowerPoint deck into a narrated explainer video, and when the product or policy changes, edit the script and generate the video again. To talk about using it across your company, contact us, or download the materials below.
Q
What is the difference between an explainer video and a product demo?
⌃
An explainer video makes the idea understood: the problem, the solution and how it works, usually without walking through every screen or feature. A product demo shows the product in use, feature by feature, for someone who already wants to see it. If the viewer still needs to understand why the product matters, start with an explainer.
Q
How long should an explainer video be?
⌃
Long enough to answer one question. Published advice ranges from about 40 seconds to two minutes. The example in this article answers one question in 48 seconds with 134 words of narration. In NoLang you can leave the duration on Auto or choose 30 seconds, 45 seconds, 60 seconds, 90 seconds, 2 minutes, 3 minutes or 5 minutes.
Q
How much does an explainer video cost?
⌃
Commissioned from a studio, an explainer or animated explainer falls between $5,000 and $50,000 across three published rate guides, and the price moves most with how complex the animation is and how many scenes it has. Our video production cost guide breaks down the ranges by video type and explains what else moves a quote.
Q
Can I make an animated explainer without animation skills?
⌃
Yes. Video tools offer animated templates you fill in, and AI video tools such as NoLang build the scenes from your script. What still needs your judgment is the script: the question the video answers and what each scene should show.
Q
Do I need to record my own voiceover?
⌃
No. NoLang reads your script with an AI voice, and you can choose the voice under Additional Settings & Attachments, then Choose a voice and character.
Q
Can I make a vertical explainer video for social media?
⌃
Yes. NoLang's orientation setting includes Vertical (9:16) as well as 1:1 and 4:5 for feed posts, next to Horizontal (16:9) for websites and YouTube. A vertical frame holds fewer words per line, so keep the on-screen text shorter than you would for a horizontal video.
Q
Can I use the example in this article for my own topic?
⌃
Yes. The Create a Video with This Template button opens NoLang with the example attached as a Reference Video. Replace the instructions with your own topic, viewer and script, then generate.