How to Make How-To Videos and Tutorials: 7 Steps, 2 Examples
Key takeaways
A how-to video shows how to do one task, step by step, so the viewer can finish it on their own. "Tutorial video" means much the same thing and is used more often for software and apps.
Before recording, write a one-page step sheet: who it's for, the start and finished states, what to have ready, and for each step the action plus what the viewer should see.
The 7 steps run from picking one task and writing the step sheet to ending every step on a visible result, adding captions, and testing on someone new before you publish.
This guide includes 2 example videos made in NoLang, a furnace filter how-to and a software tutorial, each shown with the step sheet used as its input.
In NoLang, you can attach the step sheet as a PDF, or attach your screen recordings as video assets and type the steps into the input box.
SHARE
Most first how-to videos are made the same way. You hit record, walk through the task, and then stall in the edit. Where should one step end and the next begin? Which moment needs a close-up? What should the viewer have ready before step one? The footage can’t answer those questions, because nobody decided them before recording.
You can decide them in advance, on one page. This guide calls that page a step sheet: who the video is for, where they start, what “done” looks like, and, for every step, the action plus what the viewer should see once they’ve done it right. With a step sheet in hand, the order of the video, the size of each step and the way you test the finished video all follow from its columns.
Below you’ll find what a how-to video is and where it’s used, how to write a step sheet, seven steps from the sheet to a published video, and two example videos made in NoLang from the step sheets shown next to them: a hands-on how-to and a software tutorial.
What is a how-to video?
A how-to video shows someone how to do one specific task, step by step, so they can do it themselves. Replacing a filter, submitting an expense, setting up a new printer, folding a fitted sheet: the subject is always something the viewer will go and do with their own hands or on their own screen.
That purpose gives you a simple test. When the video ends, can the viewer finish the task without help? If yes, it works as a how-to video, however it was filmed. If the viewer understands the topic but still couldn’t do the task, it’s a different kind of video.
“Tutorial video” mostly means the same thing. In practice the word leans toward software and apps: a video that takes a new user through a task on screen, often their first one. The table separates how-to videos from the formats they’re most often confused with.
How-to videos and nearby formats
Format
What the viewer can do afterwards
Scope of one video
How-to video
Finish one task on their own
One task, from start to finish
Tutorial video
Finish a task in software or an app
One task or one feature
Walkthrough
Follow the same path through screens, a game or a place
One route, shown in order
Explainer video
Understand what something is or why it works
One idea
Product demo
Decide whether a product fits their needs
A set of features
When a company turns many of its procedures into videos that people open in the middle of a job, the collection is often called a video manual. Choosing a production route and budgeting for that larger project is covered in how to make instructional videos. This guide stays with the single video.
When video works better than written steps
Use video when movement, order or “how far” is the information: how firmly to press, which way a part faces, where a menu is hidden, what the screen looks like after a click. A written list can’t show any of that.
Keep text for anything people look up: part numbers, settings, prices and long lists of values. Put them in the description or on a linked page, where they can be searched and copied.
Pair the two when steps change often: a short checklist under the video lets you correct one line the same day, while the video is updated on its own schedule.
Where how-to videos are used, and ideas for your first one
Who watches, and where they find the video, changes what the video has to show.
Four places how-to videos are used
Where
Who watches
What the video shows
Where it lives
Work procedures
New hires, staff moving to a new role
Opening and closing routines, equipment, internal systems
Intranet, learning platform, a QR code at the workstation
Software and apps
New users, users of a new feature
Setup and the first task that produces a result
In-app onboarding, help center, welcome emails
Product setup and support
Customers who just bought
Setup out of the box, routine care, fixing a common problem
Product page, a QR code in the manual, support site
Social media and YouTube
People interested in the topic
Recipes, cleaning, repairs, tips viewers can try today
YouTube, Instagram, TikTok
If you’re not sure what to make first, start with the question you answer most often. Support tickets, chat logs and repeated questions in a team channel are the best list of how-to video ideas you have. Some starting points for each place:
Work procedures: opening a store for the day, receiving a delivery and checking it against the packing slip, cleaning and restocking a station at shift change, logging a safety incident.
Software and apps: first sign-in and profile setup, the first task that gets a result (submitting an expense, publishing a page, sending an invoice), one new feature after a release, the error people hit most often.
Product setup and support: setup out of the box, routine maintenance such as replacing a filter or descaling, a factory reset, the question support answers every day.
Social media and YouTube: one recipe or technique, a fix for a common household problem, a before-and-after with every step in between.
When the videos are part of a structured onboarding or training program with learning goals, plan the program first; how to make a training video covers that side.
Before you record: write a step sheet
A step sheet is a one-page plan for a single how-to video. Write it before you film or record anything, ideally while doing the task yourself, so the starting point and the things you need are real rather than remembered. The examples come from the furnace filter video further down this page.
What goes on a step sheet
Field
What to write
Example
Who it’s for
Who watches, and what they already know
Residents changing the filter for the first time
Start state
Where the viewer is when the video begins
The heating or cooling is running and the filter is due
Finished state
What is true when they’re done, in terms they can check
New filter in, arrow toward the furnace, door closed, system on, date on the frame
You need
Everything to have ready before step 1
A filter in the size printed on the old one, a marker, a trash bag
Do this
One action per step
Slide the new filter in with the arrow toward the furnace
You should see
What the viewer sees when that step went right
The filter sits flat and the arrow points toward the furnace
Common mistakes
Where people usually go wrong
The arrow facing the wrong way
Branches
When the steps differ, and what changes
A filter behind a wall grille: open the latches instead
Final check
How the viewer confirms the whole task is done
Air flowing, door closed, date on the frame
The column that does the most work is You should see. It forces you to name a visible result for every step, and that result settles three things later on: where the step ends, what the camera or screen recording must show, and what the viewer checks before moving on. A step with nothing to write in that column usually isn’t a step yet.
How to make a how-to video in 7 steps
1. Pick one task, one viewer and one finished state
“How to use the expense app” has no finished state. “Submit your first expense” does. If your list of steps runs into a second finished state, such as submitting an expense and then approving someone else’s, that’s a second video.
Deciding the finished state also answers the length question. A how-to video is as long as it takes to reach one finished state, with waiting and repetition cut out. When a job is long, split it into parts that each end in their own finished state, so a viewer can stop after any part with something done.
Then decide who is watching and what they already know. That tells you which steps you can skip, which terms to explain and how fast you can go.
2. Write the step sheet
Do the task once yourself and fill in the step sheet as you go. If you can, watch someone new try it too: the places where they hesitate or ask a question become your Common mistakes and Branches rows.
Write each row of “Do this” as a single action with a verb at the front: Click, Slide, Choose, Write. Use the exact words that appear on the screen or on the part.
3. Open with the task, end with the final check
Build the video in this order:
The task and what it takes: name the task, when it’s needed and how many steps it has. Viewers can tell within seconds whether this is the video they need.
What you need, so viewers gather everything before they start instead of pausing halfway through.
The steps, in order, each followed by its check.
Common mistakes and branches. Show a mistake at the step where it happens, or collect them after the steps; either way, say which step a branch changes.
The final check, which restates the finished state so viewers can confirm the whole job is done.
When the result is something people want to see, such as a finished dish or an organized shelf, show it in the opening seconds as well. If a branch changes most of the steps, make it a separate video.
4. End every step on something the viewer can check
One step is one action that ends in one result the viewer can see in front of them. Use the You should see column to size your steps:
Too big: two results in one step: “Fill in the form and submit it” has two results, a complete form and a submitted expense. Split it.
Too small: no visible change: “Move the pointer to the menu” changes nothing the viewer can check. Merge it into “Open the menu.”
The right size: “Click New expense. An empty expense form opens.” One action, one result to compare against.
Number the steps on screen the same way they’re numbered on the step sheet, so a viewer who pauses can find their place.
5. Capture each step and hold on the result
How you capture the visuals depends on the task.
Hands-on tasks: a phone on a tripod or stand is enough. Shoot a wide shot that shows where you are and a close-up for the hands. Work more slowly than usual, and after each action hold the shot for a couple of seconds on the result from the You should see column.
Software and apps: start from the state a new user sees, not your own configured account. Use test data, close notifications and other tabs, and keep personal information off the screen. Move the pointer only when you’re about to click, and wait for the screen to change before the next action.
When you can’t film or record: if the screen isn’t final yet, you don’t have access to the equipment, or you need the same video in several languages, you can generate the visuals from the step sheet. Check every scene against the real task before you publish.
6. Add narration, captions and on-screen labels
For each step, say the action and then the result: “Click Submit. The status changes to Submitted.” Use the names exactly as they appear on the screen or the part, so viewers can match what they hear with what they see.
Add captions for viewers who watch with the sound off, in a noisy place or in a language that isn’t their first. On screen, show the step number and a short label for the action, and zoom in on or highlight the thing to click or touch.
7. Test it on someone new, then publish and keep it current
Before publishing, give the video to someone who has never done the task, along with the items in You need, and watch without helping. Note where they pause, rewind or ask a question. Each of those points maps back to a row of the step sheet: a missing You should see, a step that’s too big, a branch nobody mentioned. Fix the row, then fix the scene.
Publish the video where the question comes up (see the table of places above), and title it with the task in the words people use, such as “How to replace a furnace filter.”
When the procedure or the screen changes, change the step sheet first, then replace only the scenes for the rows that changed. If the finished state or a branch changed, run the test with someone new again.
Example: a how-to video made from a step sheet
This video was made in NoLang from the furnace filter step sheet. Open the step sheet under the video to compare the two.
How-to video from a step sheet
Make a how-to video that teaches first-time residents to replace a furnace air filter, following the attached step sheet.
Here is where each field of the step sheet appears in the video:
Where each step sheet field appears in the furnace filter video
Step sheet field
In the video
Start state
Opens on a gray filter: “Looking gray? It’s due for a change,” then “Change it about every 90 days”
You need
A “You’ll need” card with the three items, the filter labeled 16 x 25 x 1
Do this
A numbered title for each of the 7 steps, with a progress bar
You should see
A “You should see” label after each step, such as “Sits flat, arrow toward the furnace”
Common mistakes
Four cards with a photo of each mistake, including the arrow facing the wrong way
Branches
A separate scene for a filter behind a wall grille, with a diagram of the arrow pointing toward the duct
Finished state and Final check
A checklist that ticks off five items, then “Fresh filter. Done.”
Step 6, where the first of the common mistakes happens, is labeled “The key step” and gets a diagram of the air flowing from the duct, through the filter, into the furnace. Giving extra time to the step where a common mistake happens is a decision you can make straight from the step sheet.
How to make a software tutorial video
A software tutorial follows the same seven steps. Because everything happens on a screen, a few points matter more.
Show where to click and what happens next: every step is a pair, the control being clicked and the screen that appears after it. The second half is the You should see column, and it’s what lets viewers confirm they’re still on track.
Record from a new user’s starting point: an empty list and default settings, not your own setup. If your screens show data a new user won’t have, viewers will get lost at step 1.
Use test data: fake names, fake amounts and a test account, so nothing has to be blurred later.
Make it readable on a phone: zoom in on the area being used, so labels and values can still be read on a small screen.
Plan for interface changes: when a button moves or gets renamed, the step sheet tells you which rows and scenes to redo, instead of re-recording the whole video.
The example below is a tutorial for a fictional expense app, made in NoLang from the expense app step sheet.
Software tutorial from a step sheet
Make a tutorial video that walks new employees through submitting their first expense in the expense app, following the attached step sheet.
Where each step sheet field appears in the expense app tutorial
Step sheet field
In the video
Start state
Opens on the $42.50 client lunch, then “Before you start: Signed in to the expense app on your computer”
You need
A “You need” list: the receipt, the project code and a one-line business purpose
Do this and You should see
A bar above the app screen with the step number (such as “STEP 2 of 6”), DO THIS and YOU SHOULD SEE, while the field being used is outlined
Common mistakes
“3 common mistakes,” each shown on screen, such as a $36.00 subtotal entered instead of the total
Branches
A “Lost the receipt?” scene with the Missing receipt declaration from step 2
Finished state and Final check
The summary panel next to a checklist of three items, then “Expense submitted”
Because the action and the expected result stay on screen together for every step, a viewer who looks away can glance back and see both where they are and what they should be seeing.
How-to video examples from brands
Three short how-to videos from brand channels, and one thing each does that you can borrow.
Lowe’s: check the result before the step you can’t undo
Source: Lowe’s Home Improvement official channel
How To Caulk with a Caulking Gun is a 1 minute 36 second video from Lowe’s. It names the job on a to-do card at the start, then works through removing old caulk, cleaning, taping, cutting the nozzle, loading the gun, applying and smoothing, mostly in close-up on the hands.
What to borrow: before caulking the joint, the video runs a test bead on a piece of paper or a rag to check its size. That is a You should see check placed just before the step that can’t be undone. The advice to start with a small cut in the nozzle heads off a common mistake at the moment it would happen.
Apple Support: blur everything except the controls being explained
Source: Apple Support official channel
How to scan documents into Notes is a 56-second video from Apple Support. Apart from the title, the video stays on the phone screen, the captions describe one action at a time, and it ends by stating the result: “The scanned document saves in the note.” The description links to a support article on the same topic.
What to borrow: around 0:29, everything on the screen except the row of controls being described is blurred, so viewers know exactly where to look. Ending on the result gives viewers their final check, and the linked article holds the details that are easier to read than to watch.
IKEA: one long job, seven parts
Source: IKEA Australia official channel
IKEA METOD Kitchen Installation 1/7 - Preparing the room is the first of seven videos from IKEA Australia on installing a kitchen. This 3 minute 24 second part opens with a chapter card, covers marking a level line, checking the wall and the connections, and mounting the suspension rail, then points viewers to part 2, “Assembling the cabinets.”
What to borrow: each part is named for one stage of the job, so a viewer can stop after any part with that stage done. Numbering the parts in the title (“1/7”) tells viewers how far along they are before they press play.
How to make a how-to video with NoLang
NoLang turns text and files into a narrated video with captions. You can start from the step sheet alone, or from a step sheet plus your own screen recordings or footage.
From the step sheet. Save the step sheet as a PDF or PowerPoint file and attach it in the input box with a one-line request, or paste its text into the input box. The two examples above were made in NoLang from the step sheets shown with them, and either one can be your starting point as a template.
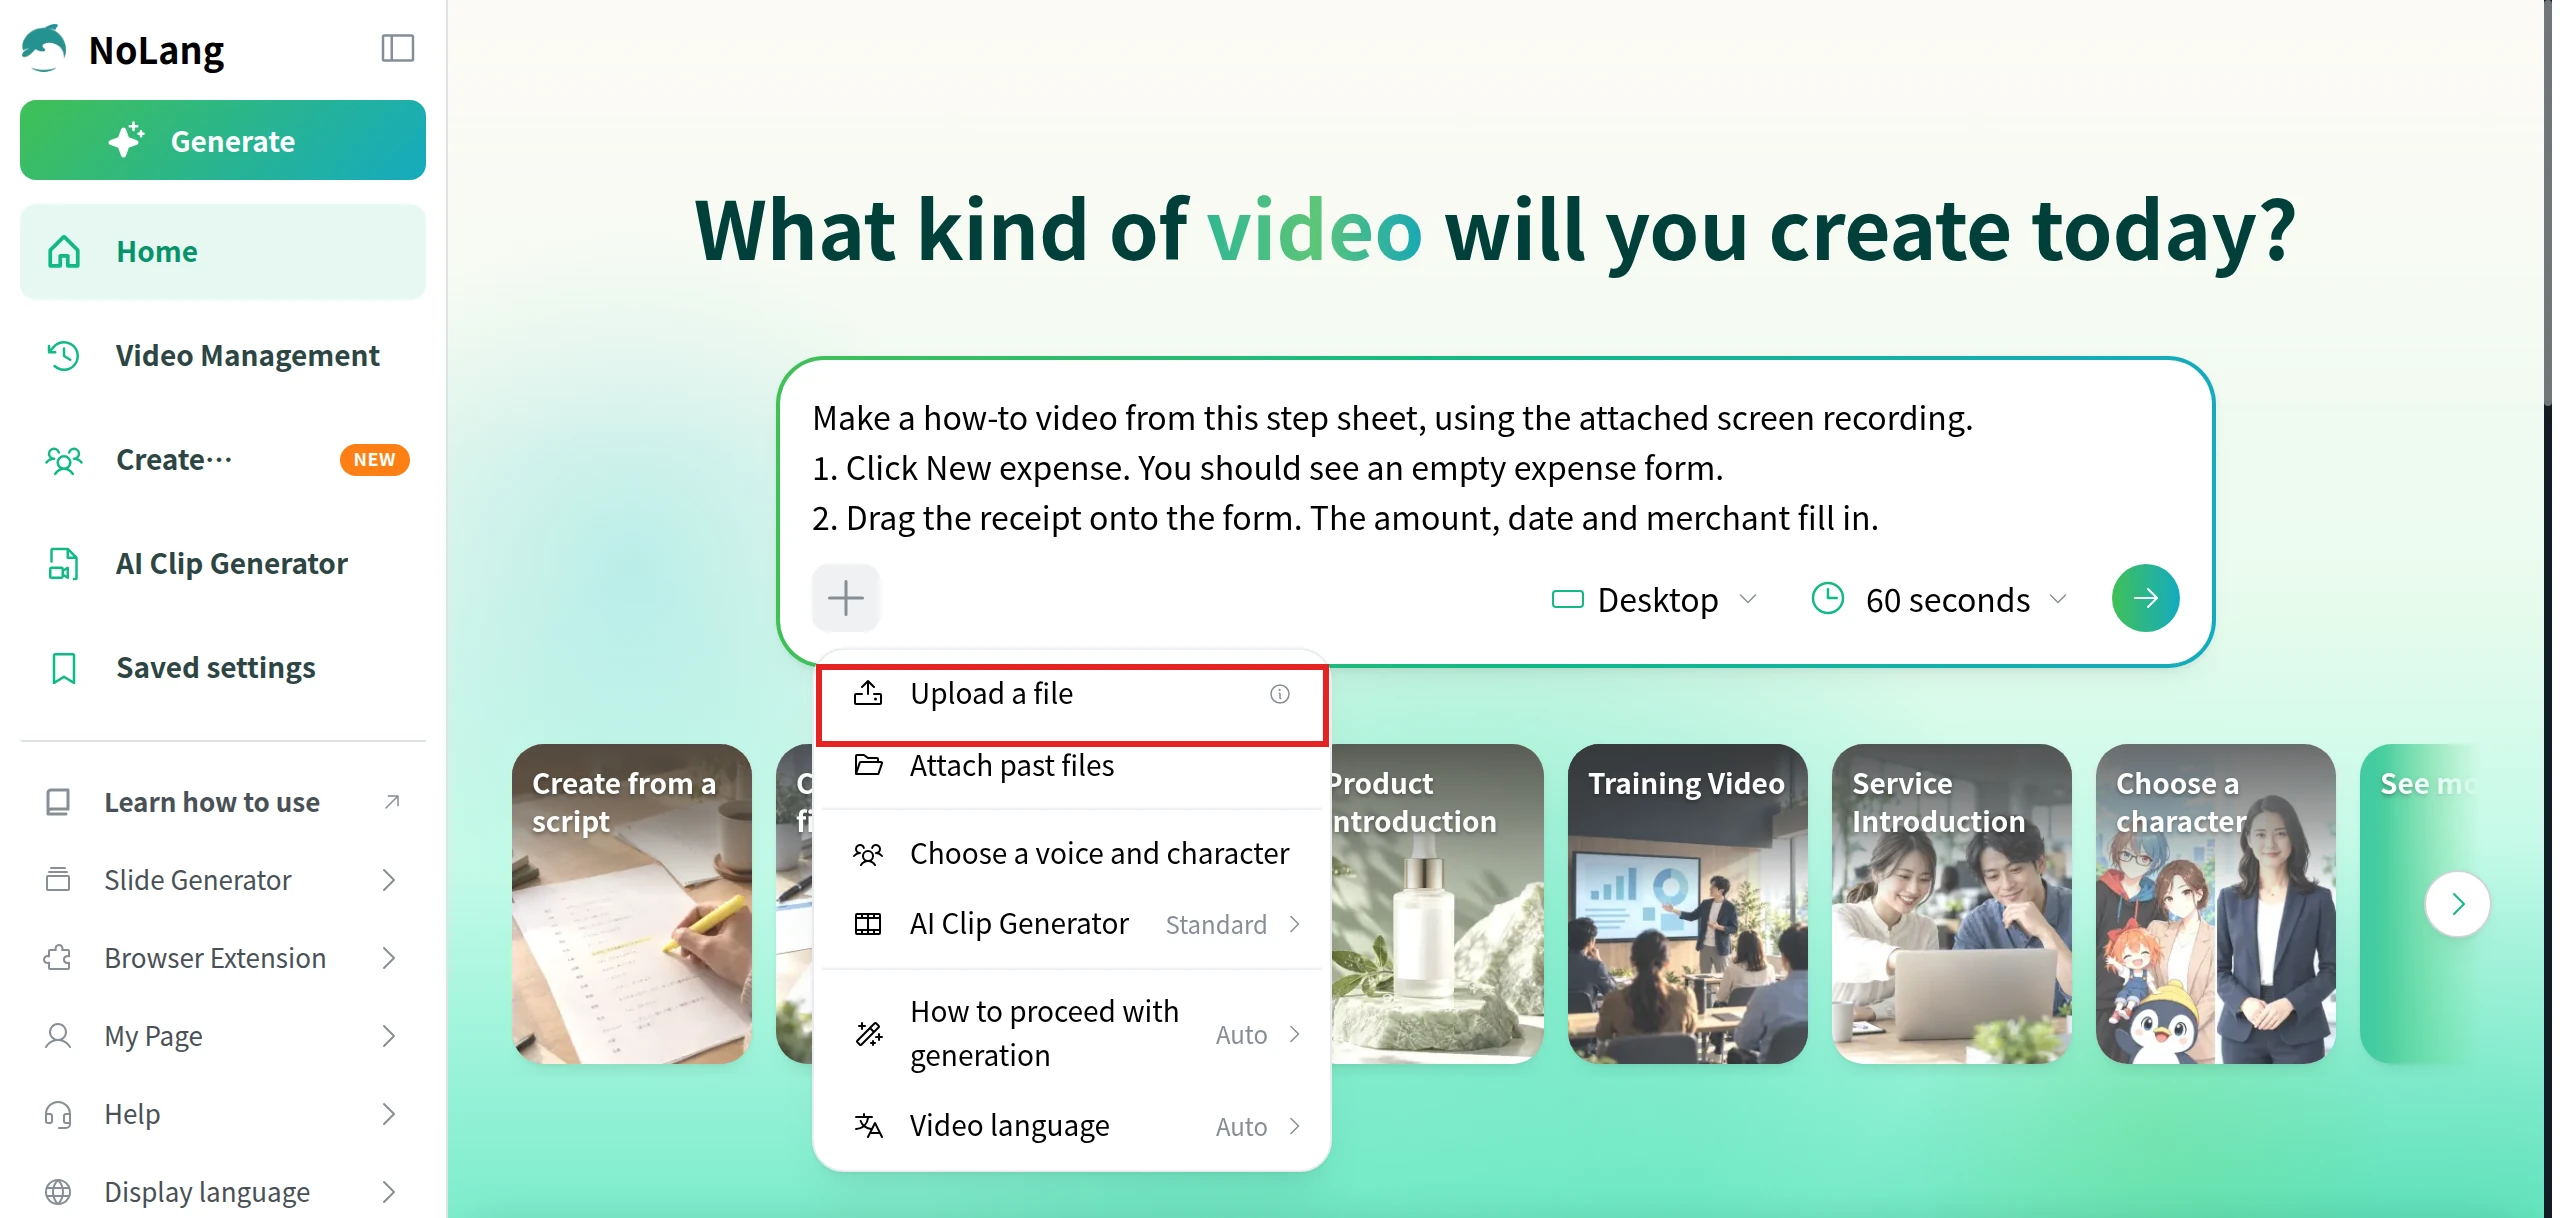
With screen recordings or footage. If you’ve already recorded the steps, attach the recordings as video assets. Type or paste the step sheet into the input box so the narration follows your steps, then click “+” and choose “Upload a file.”
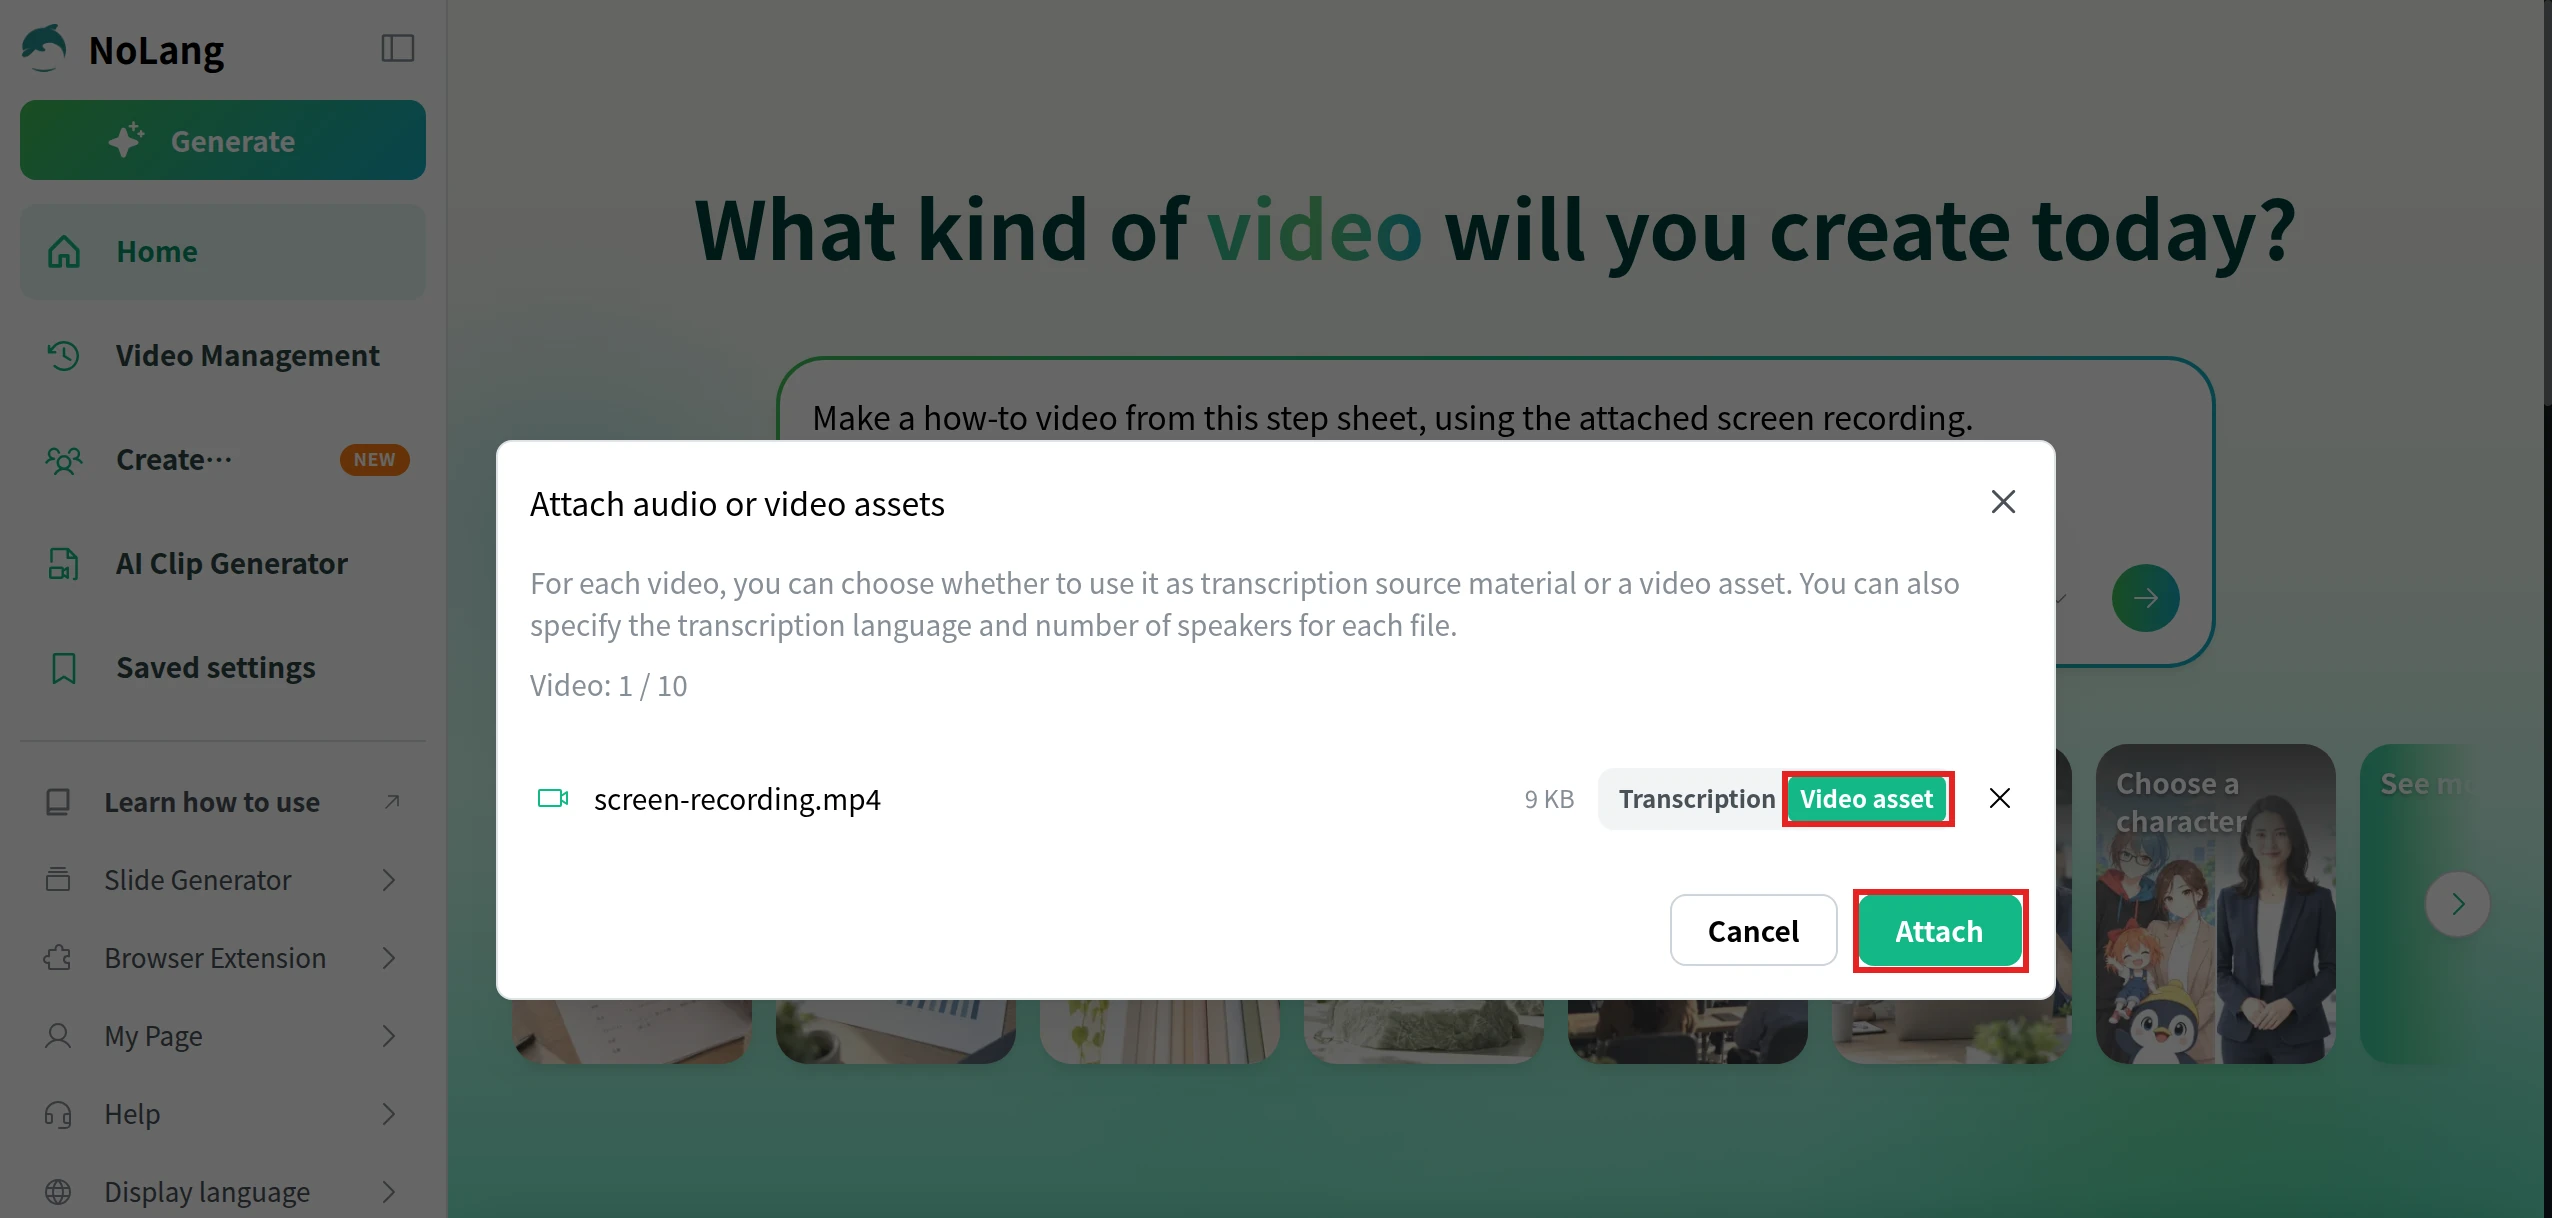
Choose the recording. In the “Attach audio or video assets” window, switch the file from “Transcription” to “Video asset,” then click “Attach.”
Once the video is generated, open it in the editor to change the narration, subtitles or images of any scene. When a step changes later, edit that scene rather than starting over.
Companies use NoLang to turn work procedures, software guides and product support steps into videos that staff and customers can follow. To see how it would work for your team, download the brochure or contact us. If your how-to videos are part of employee onboarding or training, see NoLang for training videos.
Q
What is the difference between a how-to video and a tutorial video?
⌃
They mean almost the same thing: a video that shows how to do a task step by step so the viewer can do it themselves. "Tutorial" is used more often for software and apps, where the video takes a new user through a task on screen. The same planning works for both: decide the start state and the finished state, and give every step a result the viewer can check.
Q
How long should a how-to video be?
⌃
Let the task decide. Cover one task up to one finished state, cut out waiting and repeated actions, and the length follows from that. If the video keeps growing, split it into parts that each end in their own finished state, so viewers can stop after any part with something done.
Q
What do I need to make a tutorial video?
⌃
For a task done by hand, a phone, a tripod or stand, and good light are enough to start. For software, you need a screen recorder and a test account with sample data. In both cases, a step sheet written before you record does more for the result than better equipment. If you can't film or record, you can generate the video from the step sheet with an AI video tool such as NoLang.
Q
Can I make a how-to video with just a phone?
⌃
Yes. Put the phone on a stand, film a wide shot that shows where you are and a close-up for the hands, work more slowly than usual, and hold for a couple of seconds on each result. Record in a quiet room, or add the narration afterwards. In NoLang, you can attach the clips you filmed (mp4, mov or webm) as video assets.
Q
Can NoLang record my screen?
⌃
NoLang doesn't record the screen. Record it with a screen recorder first, then attach the file (mp4, mov or webm) in the input box: click "+", choose "Upload a file", select "Video asset" and click "Attach." You can attach up to 10 video files, each up to 1 GB. A PDF or PowerPoint file can't be attached together with a video asset, so type or paste the step sheet into the input box instead.
Q
How do I update a how-to video when the steps change?
⌃
Change the step sheet first, then replace only the scenes for the rows that changed. If the finished state or a branch changed, test the video again with someone who hasn't done the task. In NoLang, you can open the video in the editor and change the narration, subtitles or images of a single scene.