Customer Onboarding Videos: 5 Types, 7 Steps and 2 Examples
Key takeaways
A customer onboarding video takes a new customer from sign-up or contract to the first result the product or service promised. It is made for customers, not new hires, and ends with one next step.
There are 5 types: welcome, getting-started, setup, feature and help videos. Each has its own moment and place, from the welcome email to the empty dashboard and the help center.
Plan each video on one page, starting from the customer’s first value: who watches, when and where, what to have ready, each step with what they should see, and the next step.
The 7 steps run from finding where new customers stall and writing the plan to recording screens from a new account, adding captions, placing each video at its moment and keeping it up to date.
This guide includes 2 example videos made in NoLang, each shown with its plan: a welcome video for a bookkeeping service, and a getting-started video for a scheduling app made from a screen recording.
SHARE
A new customer’s first days are full of small decisions. They signed the contract or started the trial because of a result they expect, and then they meet a login screen, an empty dashboard or a list of things to send. Which step comes first? What does “done” look like? Who do they ask? A customer onboarding video answers those questions at the moment they come up, so the customer can reach the next result without waiting for a call.
The hard part isn’t recording. It’s deciding what each video should get done. This guide starts there: what a customer onboarding video is and how it differs from employee onboarding and demo videos, the five types and where each one goes, a one-page plan that starts from the customer’s first value, and seven steps from that plan to a published video.
It also includes two example videos made in NoLang, each shown with the plan used as its input: a welcome video for a bookkeeping service, and a getting-started video for a scheduling app made from a screen recording.
What is a customer onboarding video?
A customer onboarding video is a short video that helps a new customer start using a product or service and reach the first result it promised. It is shown at a specific moment: right after sign-up or contract, on the first login, or when a setup step is waiting.
That gives you a simple test. After watching, can the customer get to the next result on their own? If yes, the video is doing its job, whatever its style or length.
“Onboarding” is also used for new employees, which is a different audience with a different goal. The table separates customer onboarding videos from the formats they are most often confused with.
Software and services onboard customers differently. In software, the first result usually happens on a screen: a first report, a first invoice sent, a first booking. In a service such as bookkeeping, payroll or a marketing agency, the first result depends on what the customer sends and what your team does with it, so the video has to explain both sides and when each will happen.
When a video works better than an email or a help article
When the customer has to find something on a screen: where a button is, what a setting looks like once it’s saved, what “connected” looks like. Seeing it once is faster than reading a description of it.
When the customer has to prepare something: documents, logins, a teammate’s details. A list shown with the reason for each item saves a round of follow-up emails.
When your team explains the same thing every week: if the same explanation comes up on every kickoff call or in every first-month support ticket, it’s a video.
Keep text for anything people copy or look up: settings, prices, contract terms, long lists. Put those in the email or help article next to the video.
5 types of customer onboarding videos
Most onboarding programs need a few of these rather than all five. Each type has its own moment, its own place, and a state the customer should be in when it ends.
Five types of customer onboarding videos
Type
When it’s shown
Where
When it ends, the customer
Welcome video
The day they sign up or sign
Welcome email, first screen
Knows what happens next
Getting-started video
First login or session
Empty dashboard, checklist
Has a first result
Setup video
When a one-time task waits
Next to that step
Has finished the task
Feature video
After the first result
In-app message, email
Has used the feature once
Help video
When a question comes up
Help center, support replies
Has solved it without a ticket
Welcome video: thanks the customer, says who will help them, lists what happens in the first days or weeks, and ends with one action, such as booking a kickoff call. For a service, this is where you explain the timeline and what the customer needs to send.
Getting-started video: takes the customer along the shortest path to their first result, usually a handful of steps, and leaves out everything that isn’t on that path.
Setup video: covers one task that only has to be done once, such as importing contacts or connecting another tool. Keeping it separate means you can send it only to the customers who need it.
Feature video: shows one feature at the moment it becomes useful, not on day one. Short announcements of new features belong here too.
Before writing a script, decide what the customer’s first value is: the first result that shows the product or service works for them. Not “logged in” or “finished the tour”, but something they wanted when they signed up.
Examples of a first value
Product or service
First value
Scheduling app
Someone else books a meeting through your link
Invoicing app
The first invoice is sent
Team chat app
A teammate replies in a channel
Bookkeeping service
The first monthly report arrives
Marketing agency
The first campaign goes live
Then work backwards. List the steps between where the customer starts and that result, and cut every step that isn’t needed to get there. What’s left is your getting-started video. What you cut becomes setup, feature and help videos for later.
Write a one-page plan for each video. These are the fields to fill in; the two examples later in this guide show complete plans.
Fields of a one-page onboarding video plan
Field
What to write
Customer
Who watches, and what they already know
Moment
When they get the video
Where it’s shown
The email, screen or page where they’ll see it
First value
The result the video leads to
Finished state
What is true when the video’s steps are done
Have ready
What to gather before step 1
Steps
For each step, “Do this” and “You should see”
Common mistake
Where customers usually go wrong
Who helps
Where to go when they’re stuck
Next step
The one action after the video
Two fields do most of the work. First value decides what goes into the video, and Next step decides how it ends. A video that ends with “that’s it, enjoy” leaves the customer with nothing to do. A video that ends with one action moves them on to the next result.
How to make customer onboarding videos in 7 steps
1. Find where new customers stall
Start from evidence rather than your feature list. Look at where trials or new accounts stop in your setup steps, at the support tickets from customers in their first month, and at the notes from kickoff calls. The steps where people stop and the questions everyone asks are your list of videos, in order of priority.
2. Give each video one finished state
Write down the first value, then give each video a single finished state: “calendar connected”, “kickoff call booked”, “first invoice sent”. If a video has two finished states, it’s two videos. Short videos with one result are easier to show at the right moment and easier to update later.
3. Write the one-page plan
Fill in the plan for each video. Do the task yourself in a new account while you write, so the “Have ready” list and the steps are real rather than remembered. If you can, watch a new customer try it; where they hesitate goes into “Common mistake”.
4. Write the script: the result first, one action per step, one next step
Open with the result: tell the customer what they’ll have at the end, such as “Let’s get your first booking in three steps.”
Say what to have ready before step 1.
For each step, say the action and then what they should see: “Click Connect calendar. When you see Calendar connected, step 1 is done.”
Mention the common mistake at the step where it happens.
End with who helps and the one next step.
For a service, add what your team does and when, so the customer knows what happens while they wait. If you want a script template, see how to write a video script.
5. Record the screens from a new customer’s starting point
Use a new account: record what a new customer sees, an empty dashboard with default settings, not your own configured account.
Use test data: fake names, a test calendar and test email addresses, so nothing has to be blurred later.
Clean up the screen: close notifications, other tabs and bookmark bars, and keep anything personal out of view.
Record step by step: one clip per step, or one recording with a pause after each result. Hold for a couple of seconds on each “You should see” state.
Keep it readable: record at a size where labels can be read on a laptop screen, and zoom in on the control being used.
For a service, the screens may be your client portal and the documents the customer sends. Show the real portal pages and the real names of the people the customer will work with.
6. Add narration, captions and on-screen labels
Use the exact words on the screen: if the button says “Copy link”, say “Copy link”. Add captions for customers who watch with the sound off or in a second language, and show the step number and a short label so a customer who pauses can find their place. If you serve customers in other languages, plan those versions now; how to translate a video compares subtitles, voice-over and dubbing.
7. Put each video where it’s needed, then measure and update
Place each video at the moment written in its plan: the welcome video in the welcome email, the getting-started video on the empty dashboard or the onboarding checklist, a setup video next to its setup step, a help video in the help article people already find. Title it with the result, such as “Get your first booking in 3 steps,” rather than the name of a feature.
Many email and in-app onboarding tools can also send a message when a step hasn’t been done, for example a setup video to accounts that haven’t connected a calendar after a few days. The plan’s “Moment” field becomes that trigger.
Then check four things: how many customers start the video, how many watch to the end, how many reach the first value afterwards, and whether the questions the video covers come in less often. When the product changes, update the plan first, then replace only the scenes for the steps that changed.
Example 1: a welcome video for a bookkeeping service
Northpine Bookkeeping is a fictional monthly bookkeeping service for small businesses. Its welcome video goes out in the welcome email on the day a new client signs. This is the plan used as the input:
Each part of the plan turned into a scene. Customer, moment and where it’s shown don’t appear on screen. They set the tone and the length.
Where each part of the Northpine plan shows up in the video
Plan field
In the video
First value
The opening promises “Books caught up” and “First monthly report” within 30 days
What Northpine does
A week 1–4 timeline: kickoff call, catch-up, then the first report (profit and loss plus a cash summary) with a 20-minute walkthrough call
Have ready
Three cards: online banking login, the last 3 months of bank and card statements, a list of regular bills
Steps 1–4
One scene per step, each with “Do this” and a “You should see” result: the calendar invite in the inbox, both accounts marked “Connected,” three months ticked, “No open questions”
Finished state
A setup checklist that ticks off kickoff call booked, accounts connected, statements uploaded
Who helps
Maya Torres, with “Message her any time from the portal”
Next step
One button, “Book your kickoff call,” and where to find it: the welcome email
The video adds one thing the plan doesn’t have: in step 4, a sample question from the bookkeeper and the client’s reply, so customers can see what answering in the portal looks like.
Example 2: a getting-started video for a scheduling app, made from a screen recording
Slotbird is a fictional scheduling app: people share a booking link, and others pick a time that’s open on their calendar. Its getting-started video sits on the empty dashboard, where a new trial user lands after their first login. The input was this plan and a 42-second screen recording of the three steps in Slotbird, which you can open in the template below.
Plan for the Slotbird getting-started video
Field
Plan
Customer
A consultant who just started a free trial
Moment
First login, while the dashboard is empty
Where it’s shown
Empty dashboard, day-1 email
First value
Someone else’s booking appears on their calendar
Finished state
Calendar connected, hours set, link sent
Have ready
Work calendar login, the hours they take meetings
Step 1
Click “Connect calendar.” You should see: “Calendar connected” and busy times grayed out
Step 2
Set hours (Monday to Friday, 9 AM to 5 PM) and a 30-minute length, and check the time zone. You should see: open times in the preview
Step 3
Click “Copy link” and send the link. You should see: “Link copied,” then the booking on the calendar
Every product shot in the video comes from the screen recording, cropped to the part of the screen each line talks about. The plan decided what the narration says over each shot.
Where each part of the Slotbird plan shows up in the video
Plan field
In the video
Where it’s shown
The opening shows the empty dashboard with “No bookings yet” and the “Watch” card the video sits in
Have ready
Two cards: the work calendar login, the hours they take meetings
Step 1
The recording of “Connect calendar,” with “You should see: ‘Calendar connected’ + busy times grayed out”
Step 2
Close-ups of the days, hours and 30-minute length, with “You should see: Open times in the preview”
Common mistake
A callout on the time zone field: “Wrong time zone = meetings at the wrong hour”
Step 3
“Copy link” and “Link copied,” then the booking page the other person sees
First value
The new booking from Sam Rivera on the calendar
Finished state
“That’s it”: calendar connected, hours set, link sent
Next step
A booking link added to an email signature
Who helps
The Help button in the bottom-right corner
Customer onboarding video examples from brands
Three getting-started videos from software companies’ own YouTube channels, and one thing each does that you can borrow.
Slack: a short first tour, with the rest in a series
Source: Slack official channel
How to use Slack: Your quick start guide is a 45-second tour. It introduces the parts a new user meets first, channels, files and emoji reactions, mentions, clips and huddles, on a simplified version of the interface with most of the content grayed out, and then shows where the help button is. It is the first video in Slack’s “Getting Started in Slack” playlist, and its end screen points to the next one.
What to borrow: keep the first video short and move everything else into a series the customer can continue. Showing where to get help makes a good last scene for any getting-started video.
Asana: the path to a working project first, everything else after
Source: Asana official channel
How to get started with Asana | Beginner overview 2024 runs 3 minutes 8 seconds. It opens with “Welcome to Asana. Let’s get you started in just a few minutes,” and spends the first minute and a half, up to 1:34, on setting up and using one project: create the project, add tasks with an assignee and a due date, organize them with sections and custom fields, invite teammates at 1:10, then comment on tasks and mark them complete. Only then, with “Customize your project with advanced features,” does it move on to forms, rules, dashboards, portfolios and goals. It zooms in on the control being used, highlights the row being described, and ends by pointing to the Asana Help Center. The description lists chapters, and the channel also has a longer walkthrough, “How to get started with Asana in 15 minutes or less.”
What to borrow: put the steps to the first result first and the advanced features after them, with chapters so customers can skip ahead. Offer a longer version for customers who want more, instead of making the first video longer.
Jotform: one job from start to the first result
Source: Jotform official channel
How to Create a Form with Jotform is 6 minutes 41 seconds long and follows one job from start to finish: sign in, create a form from scratch, add fields, change the design and settings, publish the form, fill it in as a respondent, and open the submission in Jotform Tables. The description lists 23 chapters.
What to borrow: end on the first value. The video doesn’t stop when the form is published; it fills the form in and shows the submission arriving, which is the result a new customer signed up for. When the path to that result is long, chapters keep the video usable.
How to make a customer onboarding video with NoLang
In NoLang, a plan typed into the input box, together with any files or screen recordings you attach, becomes a narrated video with captions. The two examples above were made in NoLang from the plans shown with them, and either one can be your starting point as a template.
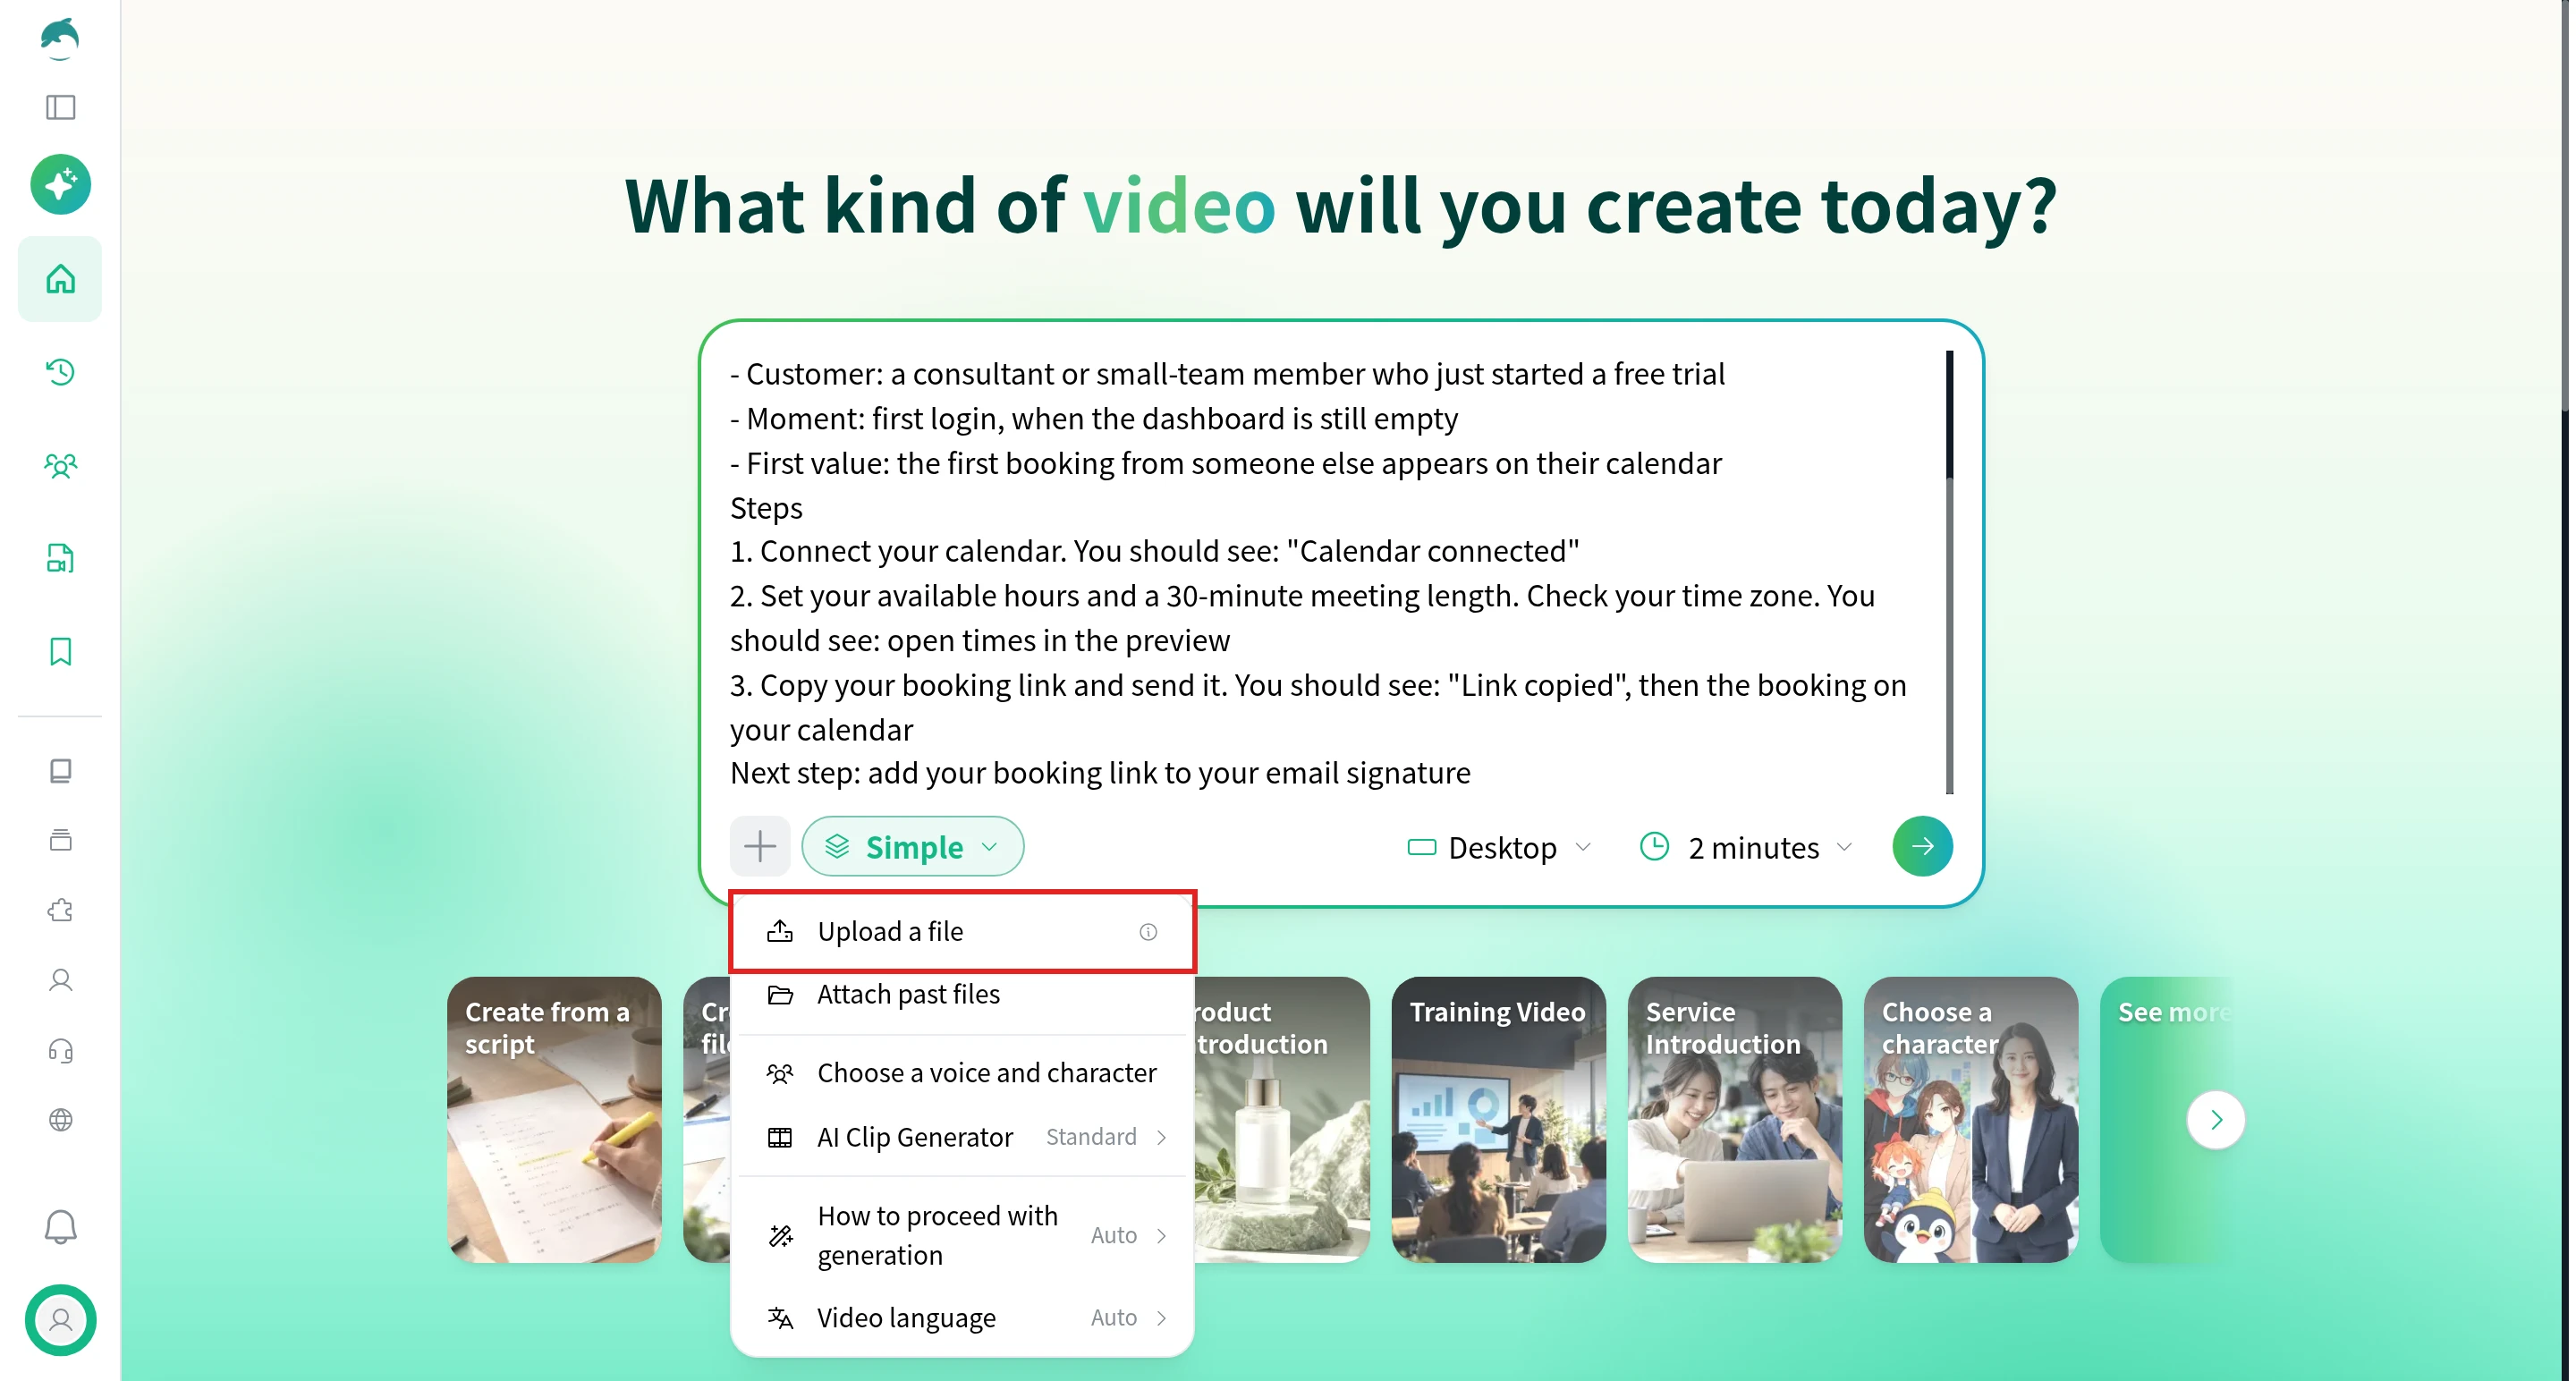
From a plan. Paste the plan into the input box with a one-line request, such as “Make a welcome video for new clients, following this plan.” If the plan, a kickoff deck or a quick-start guide is already a file, attach it as a PDF or PowerPoint file: click “+” and choose “Upload a file.”
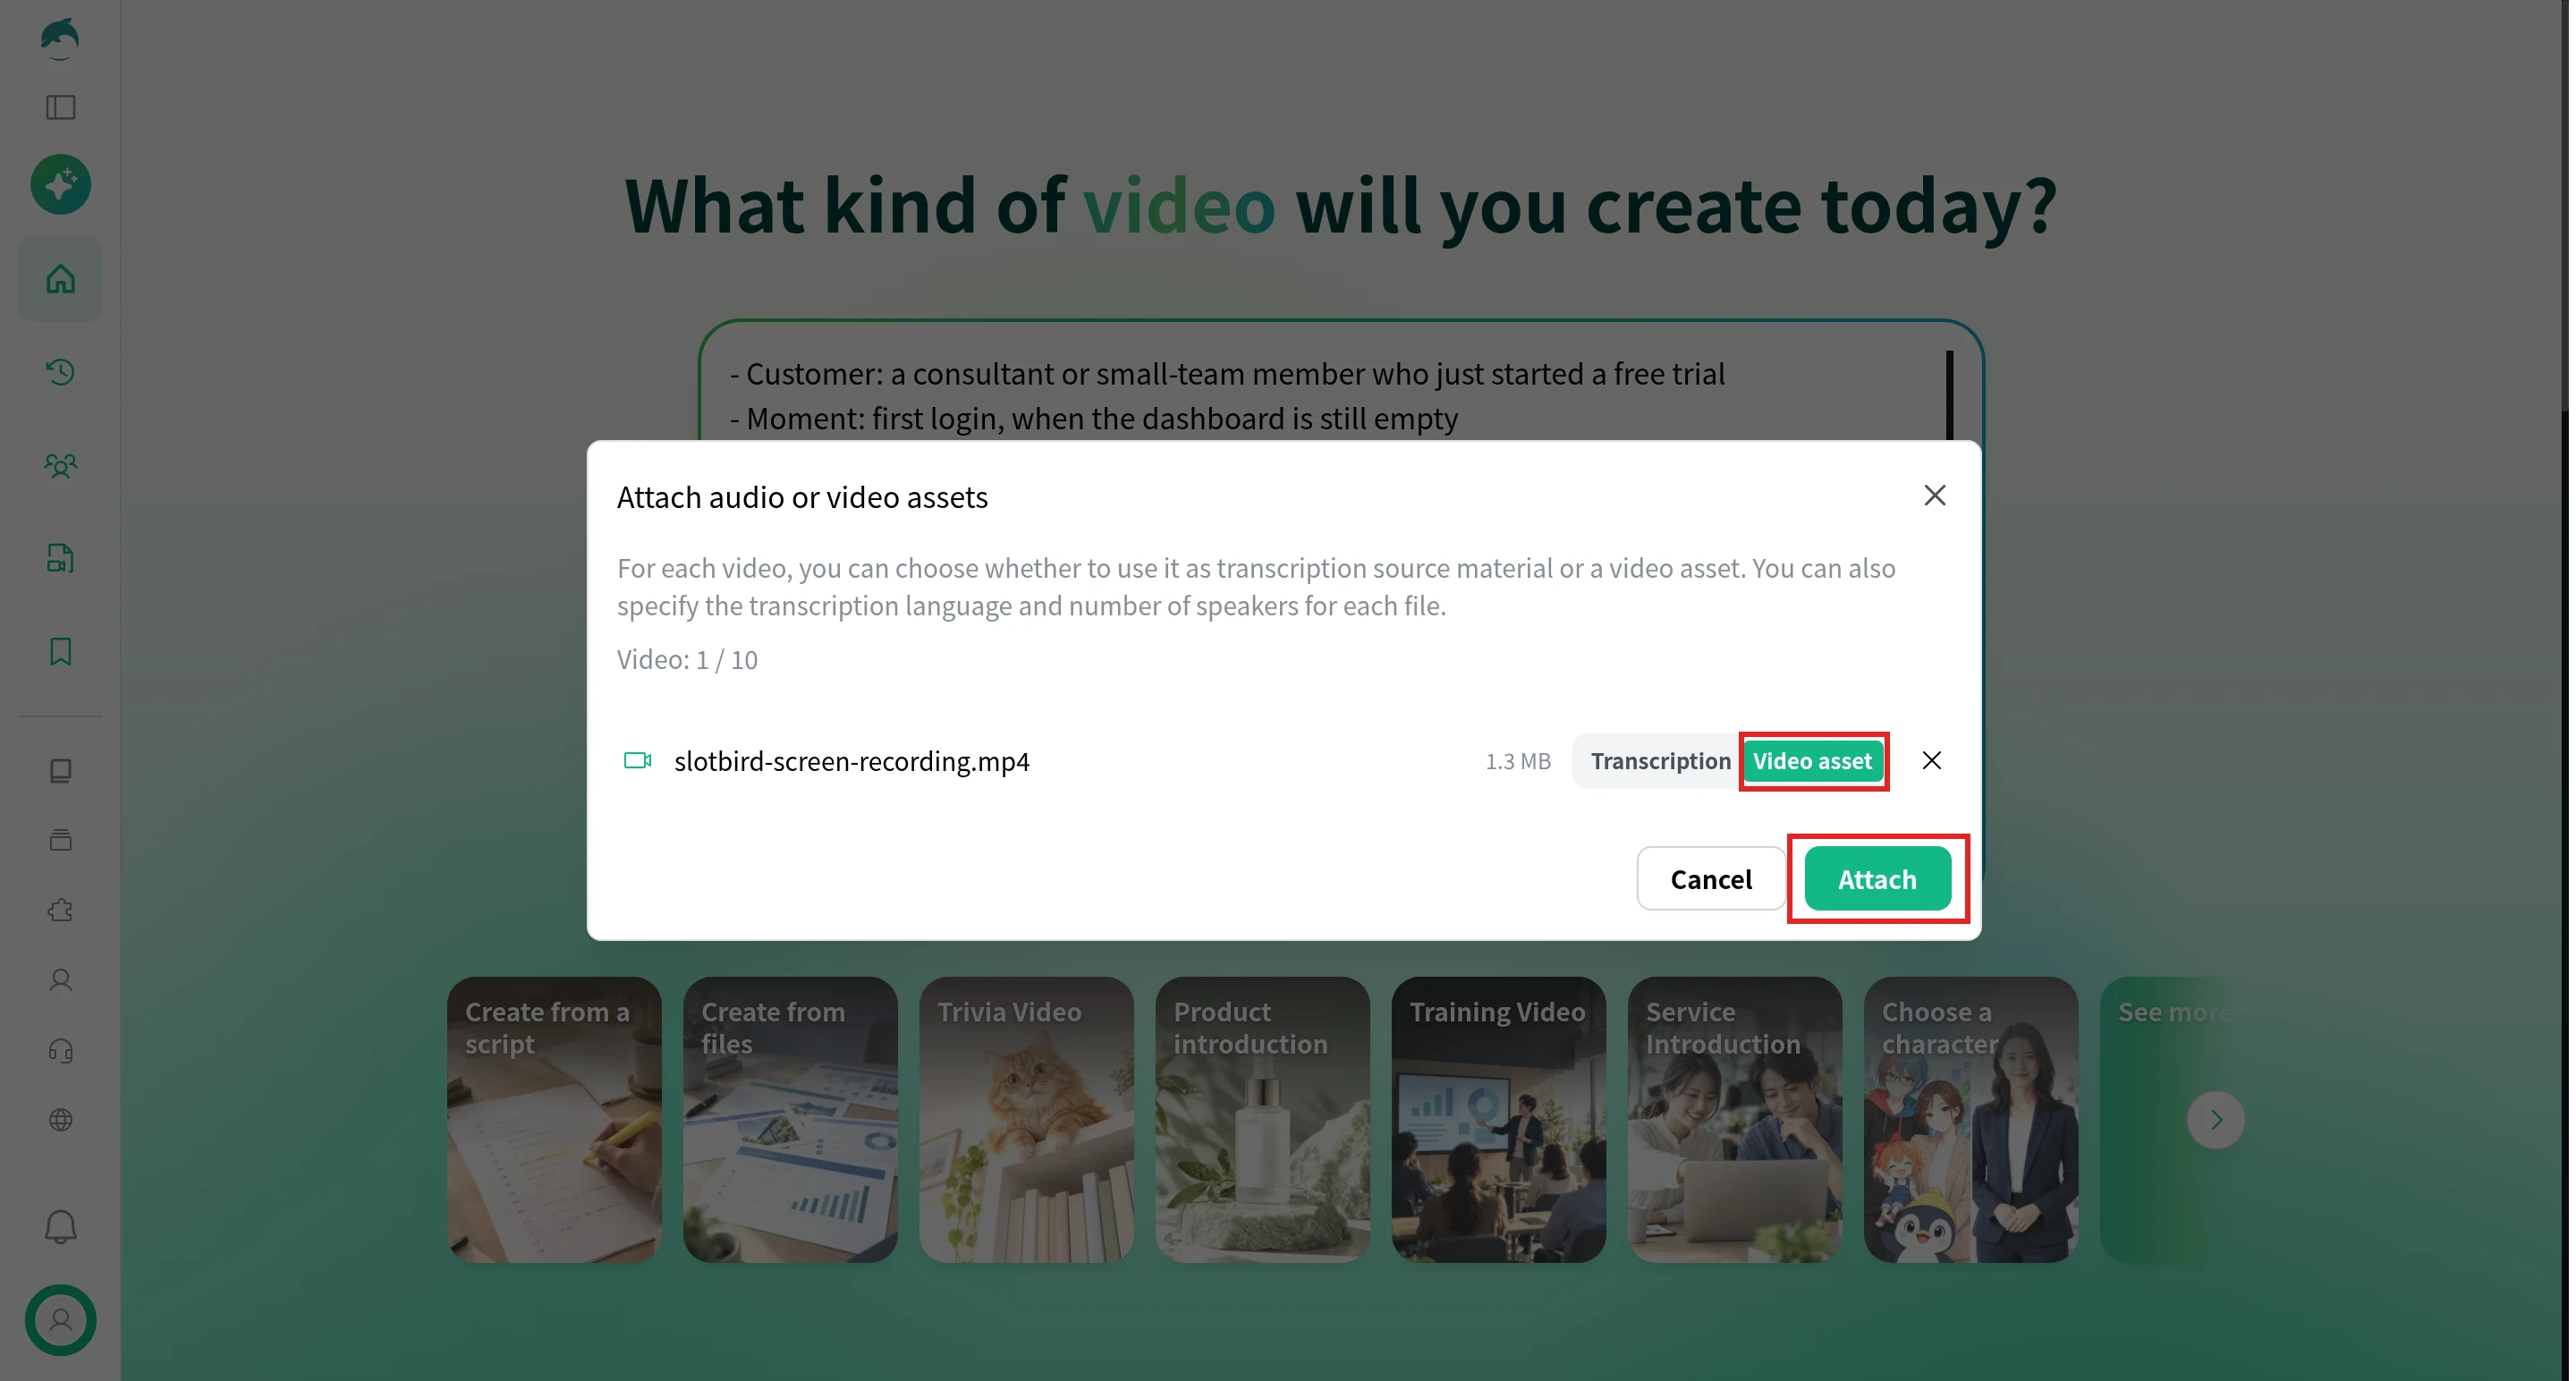
With screen recordings. Paste the plan into the input box as text, then click “+” and choose “Upload a file.”
Choose your screen recording. In the “Attach audio or video assets” window, switch it from “Transcription” to “Video asset,” then click “Attach.” You can attach up to 10 videos (MP4, MOV or WEBM).
In another language. Under “+”, “Video language” sets the language of the video. Choose it before you generate, then check the captions against the screens.
When the product changes. Open the video in the editor and change the narration, text or images of the scene for that step, rather than starting over.
Companies use NoLang to turn onboarding plans, kickoff decks and product screen recordings into videos for new customers, in the languages those customers use. To see how this would fit your own onboarding, download the brochure or contact us.
Q
How long should a customer onboarding video be?
⌃
As long as it takes to reach one result. A welcome video only needs to cover what happens next and the first action. A getting-started video covers the few steps to the customer’s first value. If the path is long, split it into separate videos that each end in their own result, or add chapters so customers can skip to the step they need.
Q
What is the difference between customer onboarding and employee onboarding videos?
⌃
Customer onboarding videos are for people who just bought or started a trial, and their goal is the customer’s first result with the product or service. Employee onboarding videos are for new hires, and cover the company, its tools and the new hire’s role. The planning is similar, but the viewer, the moment and the finished state are different, so make them as separate videos.
Q
Where should I put customer onboarding videos?
⌃
Where the customer is when they need it: the welcome video in the welcome email, the getting-started video on the empty dashboard or onboarding checklist, a setup video next to the setup step, and help videos in the help articles customers already find. Title each one with the result it leads to.
Q
Should customer onboarding videos be personalized?
⌃
Personalize where it changes what the customer does. Customers who bought different plans, products or services often need different steps, so make a version for each group. For high-value accounts, a short personal video from the account manager on top of the shared videos adds a person to talk to. Most of the steps can stay in videos that every customer in a group receives.
Q
Can I use screen recordings to make an onboarding video in NoLang?
⌃
Yes. Click “+” in the input box, choose “Upload a file,” select your recordings, set them to “Video asset” and click “Attach.” You can attach up to 10 videos (MP4, MOV or WEBM) of up to 1 GB each. A PDF or PowerPoint file can’t be attached together with video assets, so paste the plan into the input box as text instead.
Q
How do I keep onboarding videos up to date when the product changes?
⌃
Change the plan first, then replace only the scenes for the steps that changed. Short videos with one finished state each are easier to update than one long tour. In NoLang, you can open the video in the editor and change the narration, text or images of a single scene.
Q
Can I make the same onboarding video in other languages?
⌃
Yes. In NoLang, open “+” in the input box and choose a language under “Video language” before you generate. It lists 34 languages, including English, Spanish, French, German, Portuguese and Japanese, and “Auto” decides the language from your instructions. Check the captions and the screen names against the product in that language before you publish.